
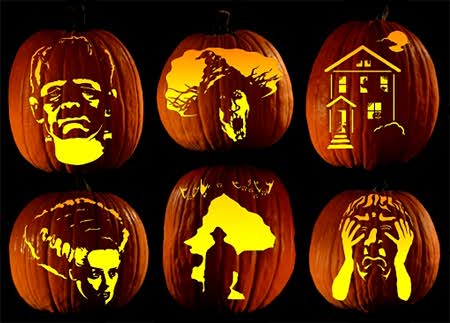
Carve a Jack O’Lantern using a template
Carve a Jack O’Lantern with a Template

How to carve a pumpkin for Halloween using a template:
- Decide before you pick out your pumpkin what design you would like to carve. Deciding upon the design ahead of time will help you pick out the best pumpkin for your chosen design.
- Choose a pumpkin with as smooth a skin as possible, free of scratches scars, and in a size and shape which will accomodate your design. Choose a pumpkin which will sit flat. If possible, go directly to the farm and buy a fresh pumpkin. To determine if it is fresh, push gently on the flesh around the stem; if it is mushy or “gives” then the pumpkin is old and you should select another. A firm stem generally indicates a fresh pumpkin, however, do not lift the pumpkin by the stem, which can damage and age your pumpkin.

- Wipe off the pumpkin with a damp cloth.
- I suggest you carve your pumpkin the day before you are going to want to light it to keep it fresh and the pattern edges sharp.
- Decide if you want to cut the bottom of your pumpkin or the top, like a cap. If you are cutting the top off the pumpkin like a cap, cut at an angle, so that when the cap is put back on, it does not fall inside the pumpkin.

- Use a large spoon or a gelato spade like this one to clean out all of the insides and seeds from your pumpkin. You will want to scrape the insides clean. Leave the backside of your pumpkin thicker, and scrape the inside of the front of your pumpkin, where you will be carving your design down to about one inch. If you scrape it too thin, and have a detailed carving, your carving might collapse. Alternatively, you can cut the bottom off of your pumpkin so that you will set it over top of your candle.

- Print out your template, enlarging if you need to make it fit on the pumpkin.

- Tape your template onto the pumpkin.

- Using a nail, a thumbtack, or a pumpkin carving tool, punch holes on the lines of the pattern. Punch the holes so close that they touch one another.

- Remove the paper and carefully cut your pattern along the punched lines.
- Gently push out the pieces you have carved out of the pumpkin.
- Fill a bathtub or large tub with cool water and gently place your pumpkin in the water for about ten minutes. This will allow your pumpkin to absorb water to keep it from drying out. Remove your pumpkin carefully and pat it dry, both inside and out. Coat the inside with petroleum jelly to prevent the pumpkin from drying out.
- Your pumpkin or Jack O’Lantern is now ready to display!
- You can put a candle inside your pumpkin. If you want to leave the top on your pumpkin, cut a small hole in the back toward the bottom of your pumpkin to act as a chimney. If you are leaving the top on with a candle in it, if you sprinkle some cinnamon on the inside of the cap, your pumpkin will spread the smell throughout your room.
- A battery operated tea lamp is always safer than a burning candle.
- For some special effects, you can put colored tissue paper behind the carved-out holes. ONLY do this with a battery operated candle. You can use different colored tissue paper behind different holes.


Search for the perfect template for your Halloween pumpkin and have some family fun creating your Jack O’Lanterns!


What a great idea! that my little granddaughter would love. Have a wonderful weekend!
Quite a work of art; lots more tools available then when my kids were little. Love the castle pumpkin!
Hi Chloe, such fun with the templates. A great tool for non-artists.
Great advice- a few other notes:
– It’s a better idea to not carve your top (or bottom) in a circle, leave a notch so that it is obvious which direction the cap fits on.
– If you want to carve more than a day ahead of time, soak the pumpkin overnight before coating it- if you have a hard time getting it fully submerged , put it in a trashbag first and fill up the trashbag (inside the bathtub). Make sure to get petroleum on all the cut surfaces so they don’t wilt, then spray the whole thing down with insecticide.
– A candle will quickly cook your pumpkin. Using a light gives you a lot more options in terms of color, is reusable, and your pumpkin will thank you!
Thanks for sharing your tips! I am sure my readers will find them helpful!!