
Step-by-step Directions for Making this Gorgeous Holiday Decorated Mailbox
Make your mailbox the standout on your street by decorating it for the holidays. These step by step directions will walk you through how to recreate this for your mailbox!

This post contains some affiliate links for your convenience. Click here to read my full disclosure policy.
Create the base:
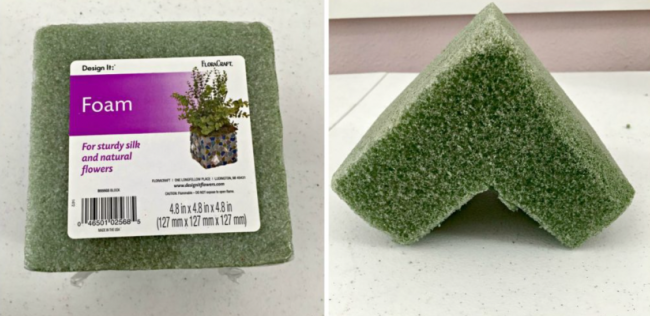
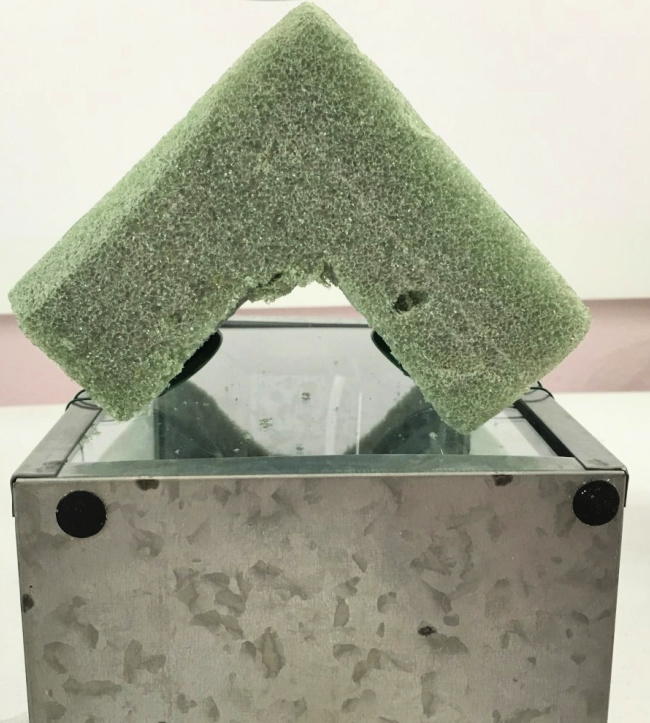
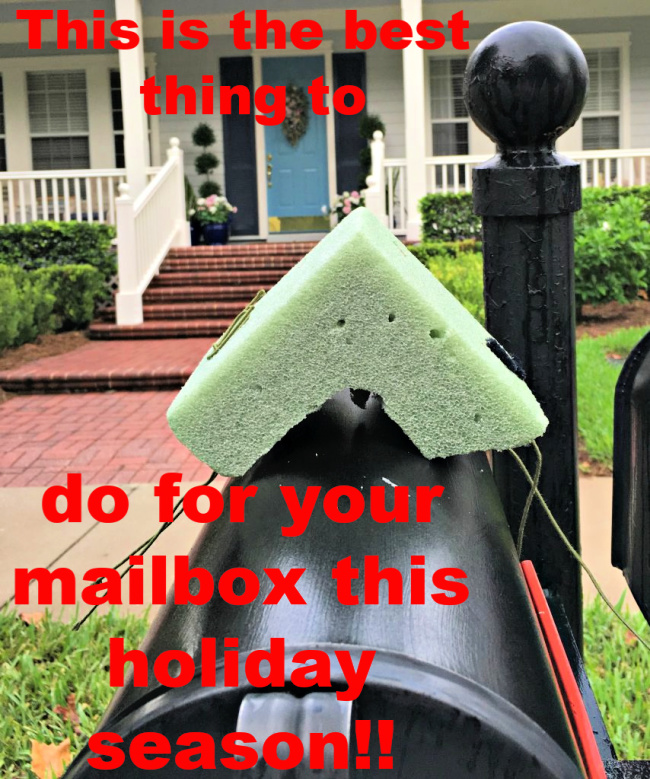
I began with a 4.8″ cube of styrofoam and cut a corner out of it with an Exacto knife.

The mechanics of this are important so that you can attach your final decoration firmly to your mailbox. I used 24 weight floral wire and 4 buttons to secure the wires to my foam. Bend the wire in half and thread it through your button.
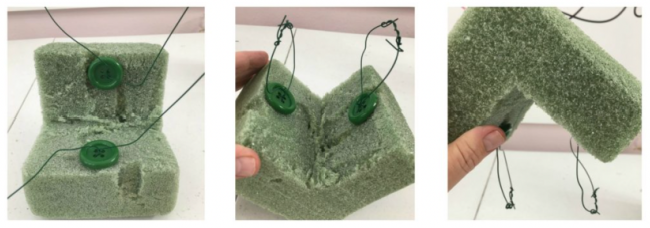
Push the wire down through your foam and on the back of your foam you will feed the two wires through another button, twist them tightly and then use the remaining length of wire into a circle. You will use those two circles to attach wire or zip ties to secure this to your mailbox.
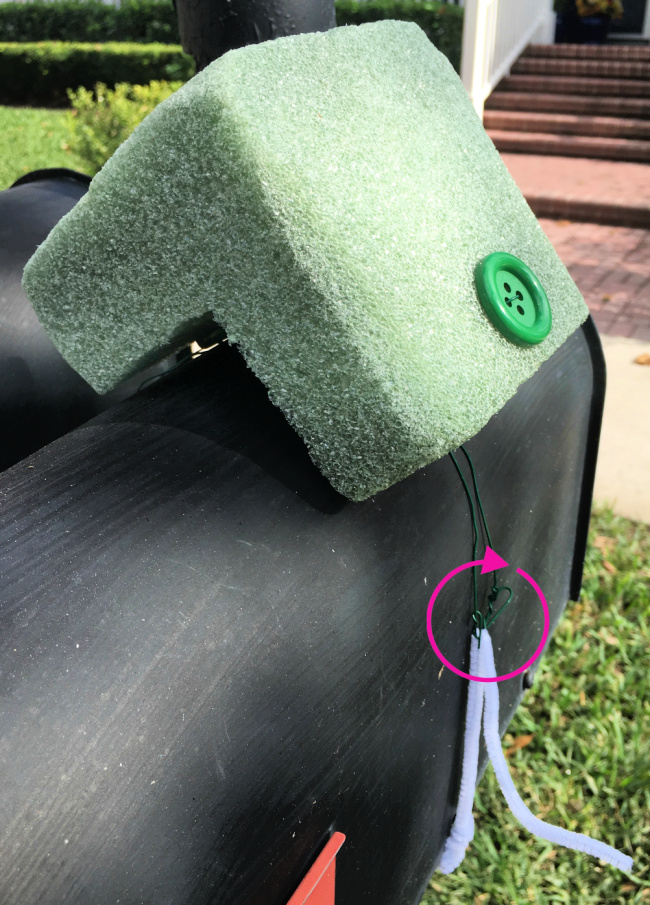
For this demonstration I used white pipe cleaners to show you how you will thread the pipe cleaners through the wire circle, take the pipe cleaner beneath your mailbox and secure on the other side in the same way. I had to wire 3 pipe cleaners together to reach around my mailbox and up the other side to my other circle.
While working on my decoration inside, I sat it up on this lantern which I had turned on its side. This will be how the foam sits on top of your mailbox.
Time for the pretty stuff:
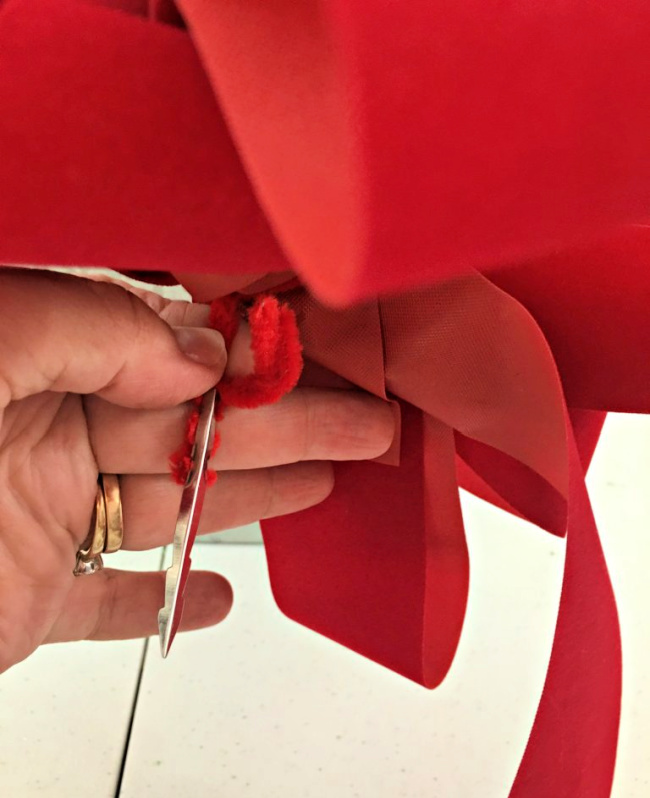
I tied a big red fluffy bow out of outdoor red velvet ribbon, and then secured a steel pick to the pipe cleaner I had used to tie my bow. This will keep the bow secure in the foam. Don’t know how to tie bows? Have you thought about asking for a ProBow for Christmas? I have!
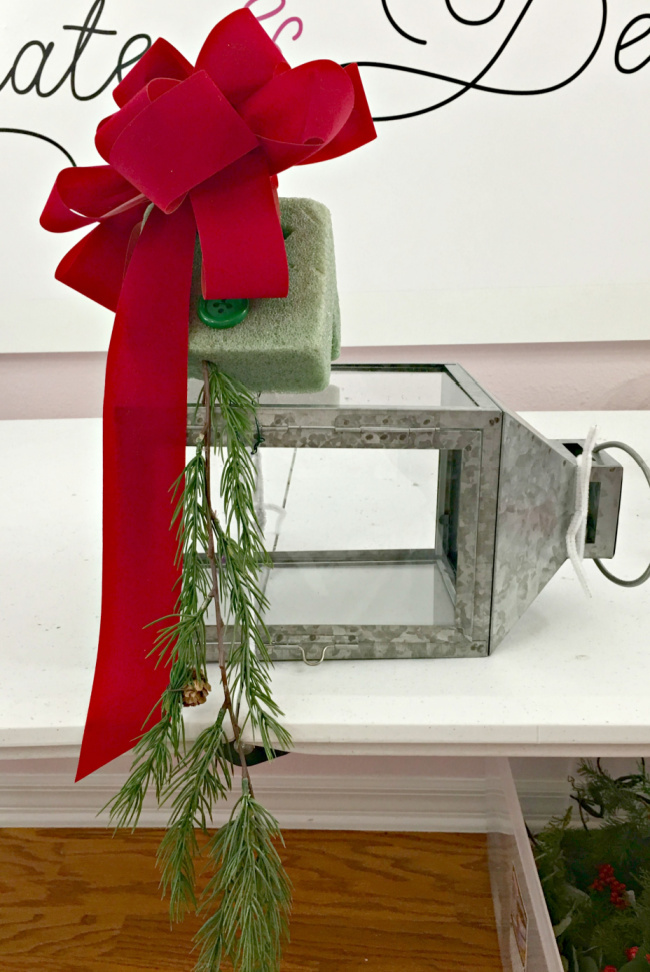
I have turned this sideways so you can see how your mailbox will look from the side as you are beginning to make your arrangement.
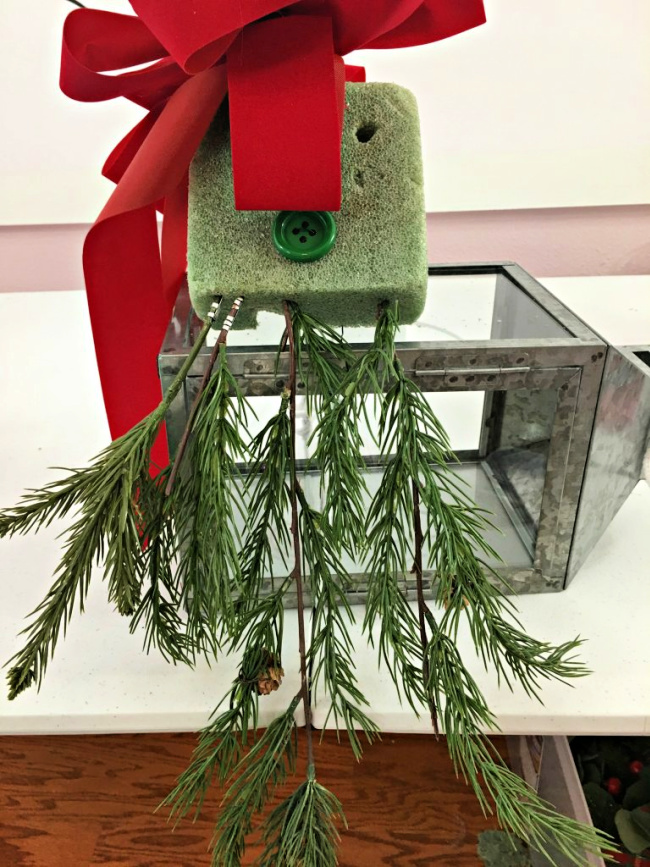
I stuck the bow right in the top of my foam piece. Then I added several longer pieces of miscellaneous faux Christmas greens so they will flow over the side of my mailbox.

Continue to add greenery to your foam, but don’t go overboard with it yet!
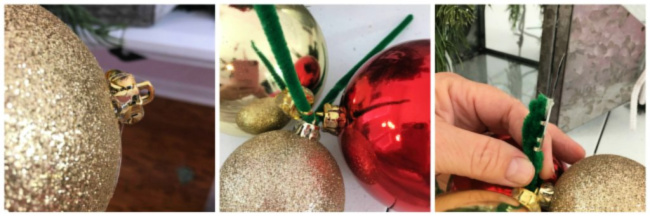
The next step is to add several shatterproof Christmas balls. First add a little bead of hot glue around the cap on the top of the ornaments so the caps don’t pop off and send your balls rolling down the street. Next, feed a pipe cleaner through three different ornaments. I chose to use red and gold ornaments to match my outdoor decor this year. Bend the pipe cleaner over and add a steel pick OR a wood wired stick to them.

Begin adding the balls to your arrangement. Use a different textures and colors for a nice variety to your decoration.
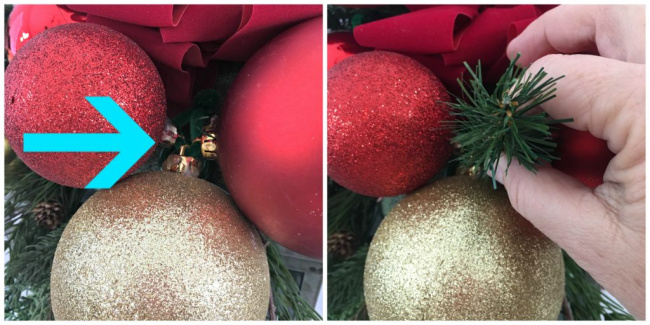
Now will be the time to fill in with the extra greenery. After you have added all of the ornaments you want, go back and see where you can still see the foam or the mechanics of the arrangement like you see above. It was easy just to add a couple of little sprigs of greenery between the ornaments to finish up!

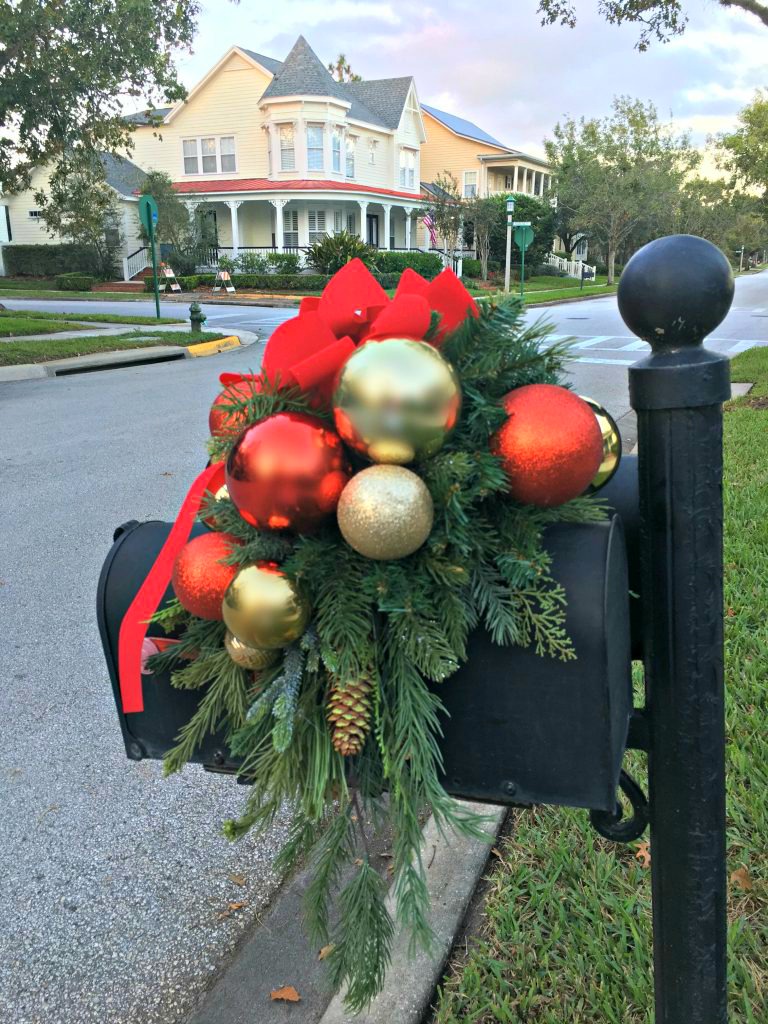
Here it is, my finished mailbox decoration for Christmas. I will keep it inside until right after Thanksgiving, but it is all done and ready to attach to my mailbox!
Shop the items to make this holiday decoration:
- Styrofoam block
- Wood wired sticks
- Red Velvet ribbon
- Artificial Christmas greens or these
- Buttons
- pipe cleaners
- Floral wire
- Wire cutters
Looking for more crafts? Check them out here: Celebrate and Decorate Crafts
Shop My Christmas Favorites for Your Home

Beautiful decoration for the mailbox. Your instructions were clear and well illustrated. Thanks for the details! That is key!
Excellent directions thank you
Thank you!
Beautiful mailbox decoration! Since you had to start with a block of florist foam, I might carve the bottom with a curve to it to match the top of the mailbox, instead of a corner. It would give more support in the wind or with the decorations if they get too heavy.
I could have, but I never seem to have a problem with mine cut like I do. We do get strong winds and mine holds up fine!
Where did you get your fake or artificial greenery? I live in Florida so my stores are limited to JoAnns, Hobby Lobby, Michaels and Dollar Tree.
I live in Florida, also, Shawn and I get most of my artificial greens from Michael’s but also some from Hobby Lobby.
I have the lg mailbox what sz foam do I need and what sz buttons? Ty
It doesn’t matter what size buttons you use, just something to keep the wire from pulling through the styrofoam.
Beautiful!!! I’m going to try this. You are very creative. I just signed up to your blog. Can’t wait to see more of your work.
I will be decorating for the larger mailbox what sz form will I need to buy
You can use the same size of square of foam, just make the arrangement larger.
Have you ever used fresh greens? I am getting a late start, so I wonder if this would hold up for a couple of weeks?
If you live in a cool climate you should be just fine with fresh greens. Alas, here in Florida it doesn’t take long for them to0 dry and shrivel up!
Excellent idea, I love it
Thank you! There are so many holidays you can decorate your mailbox for!
Chloe, I love your pretty mailbox saddle. Some years I purchase them, and they cost so much, so I’m very appreciative of your tutorial.
I read your comment on my blog, and I’m so sorry y’all had flooding. I can relate because we had a tornado devastate our neighborhood in March, and we’re still cleaning up as a community although our house was finally put to rights last month.
Thank you so much Ricki! Oh my, I don’t think there is anything as frightening as a tornado, there is just no warning and no way to prepare. I am glad things are getting put right there! Oh, yes, we are muddling through. We knew we would replace the floor someday in this house, but now that it is imminent, there are a few other things we want to do before the new floor goes in so we don’t damage the new in the process! Happy Thanksgiving!
I love this Chloe! You always inspire me with your creative ideas.
Wow – this is so cool – I wish I had a mailbox! 😉 Happy Holidays down there!
I usually put something on my mailbox but nothing so elaborate looking, yet looks so easy. Thank you for the idea of using the styrofoam block. This would work on my garage lights making them all match (sort of). Also the list of materials is helpful.