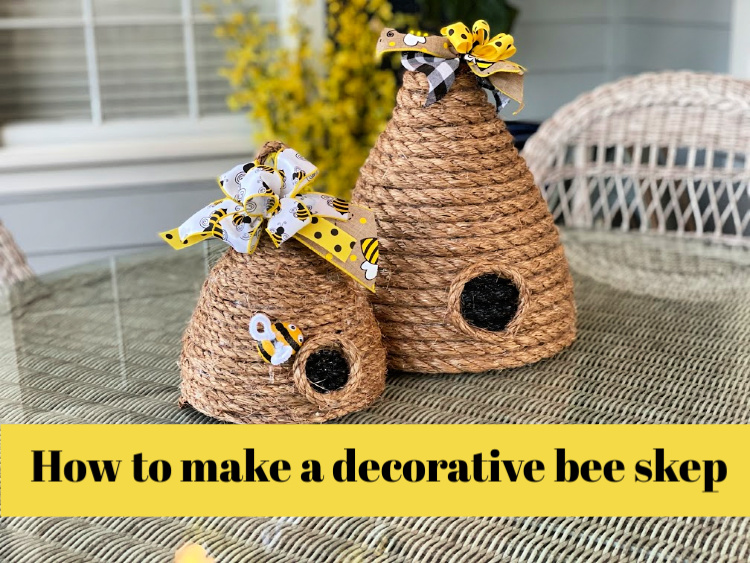
How to Make a Decorative Bee Skep
Back in January a good friend sent me a picture of an adorable decorative bee skep. It was just so cute, I knew I wanted to try a diy bee hive myself! There are all kinds of crafters making these and I have seem them made in different ways! When I started thinking about the shape I wanted to use, I knew just what I wanted!
A bee skep is the traditional dome shaped coiled straw hive. Primitive bee skeps, if they can be found are treasured by collectors. Placing one of these in your garden gives it a primitive look. These are perfect for spring decor. You can find these bee ornaments in all kinds of home and garden decor.
This post contains some affiliate links for your convenience. Click here to read my full disclosure policy.
This diy bee hive decoration will be a great addition to your home decor, no matter where you choose to display it! With these instructions you can make your own diy bee skeps.
The supplies:
- Large Easter Eggs
- Rope
- Hot Glue
- Hot Glue Gun
- Black Acrylic Paint
- Scissors
- Bee lights
- Bee themed ribbons
- Wire cutters
- wood skewers
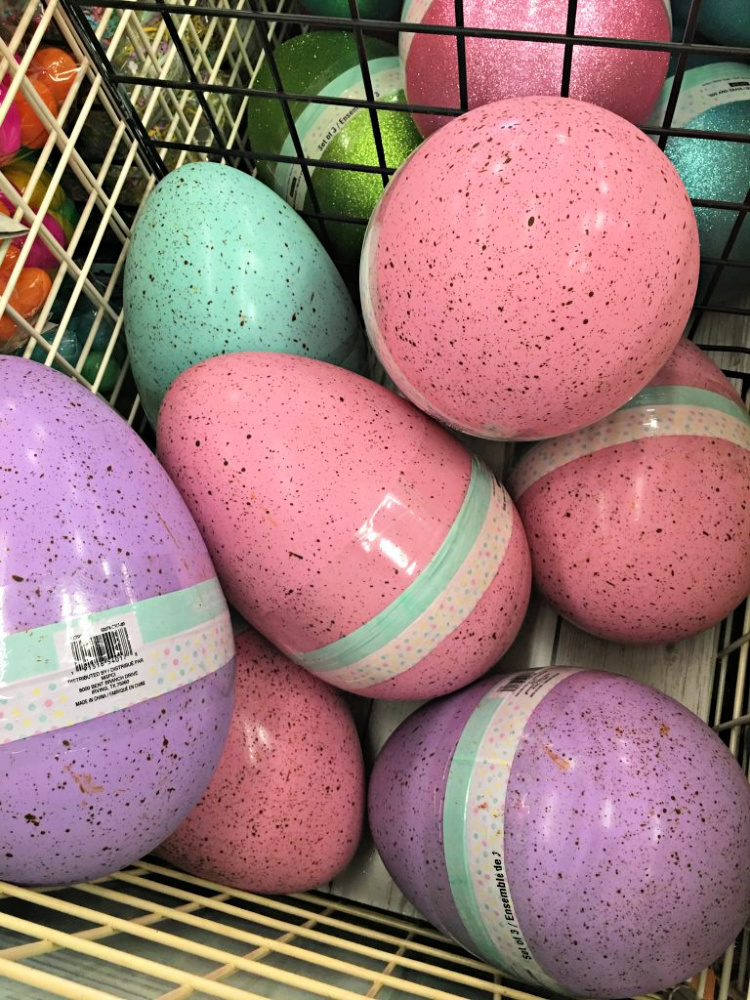
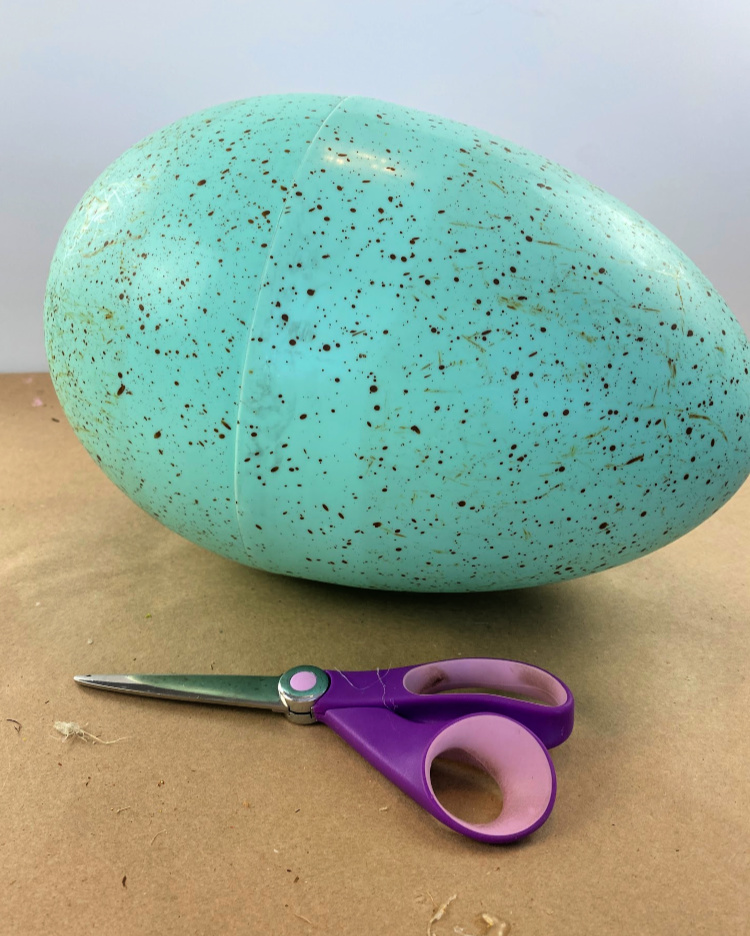
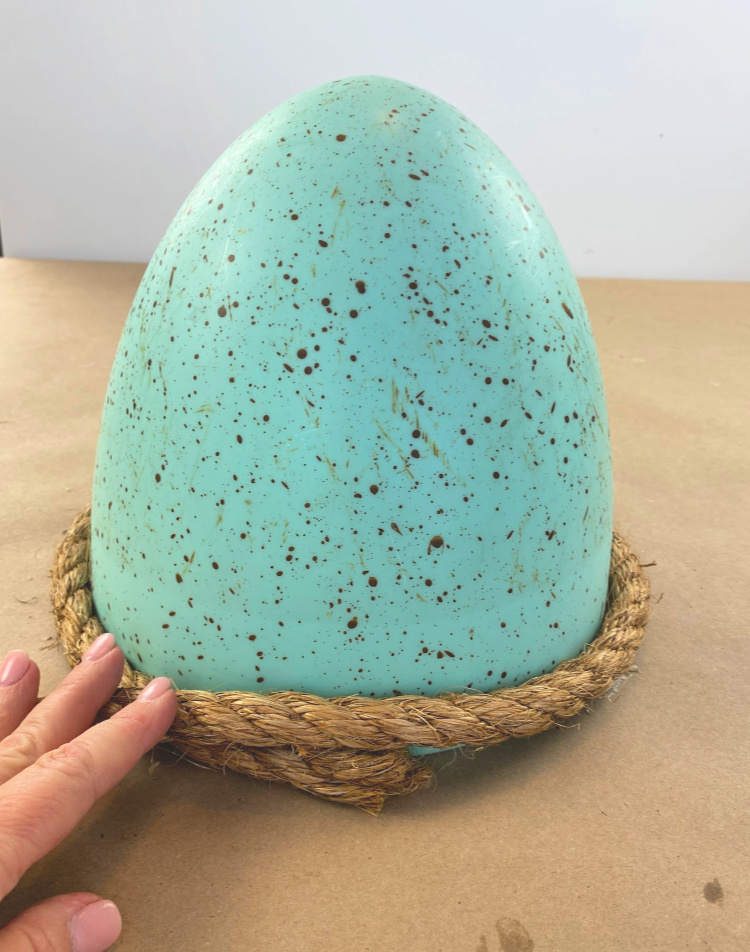
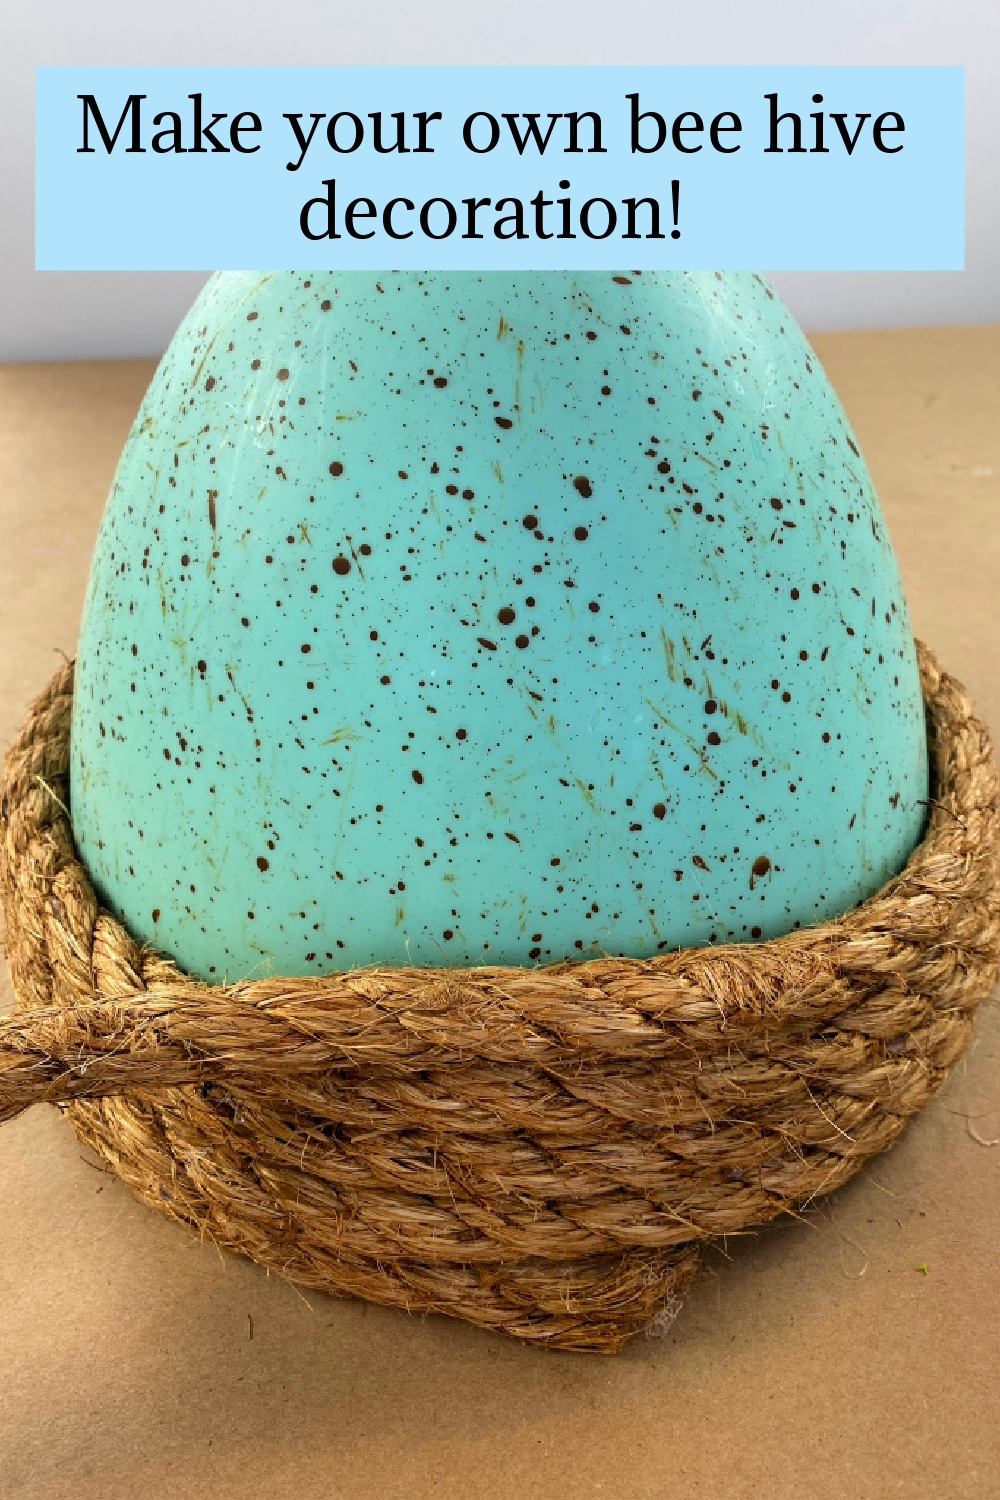
Easter eggs! Giant, oversized Easter eggs! The ‘top’ half of the egg would be the perfect shape to make a bee skep! Now, the problem was, I am stuck at home and I was sure I bought an extra set of these nested eggs last year, just in case they didn’t have them this year. (Do you ever do that?) I used these same eggs to make a Easter Egg Topiary last year! You might find these eggs at Michaels or Hobby Lobby. You can even buy the tiny size and make them into little bee hive ornaments.
Step 1:
Using the largest egg in the set, open up the egg and only use the top half of the egg. Take the jute rope, wrap it around the base of the top half of the egg and start it as shown and begin using hot glue to attach the bottom side of the rope on top to the top of the rope beneath it.
Step 2:
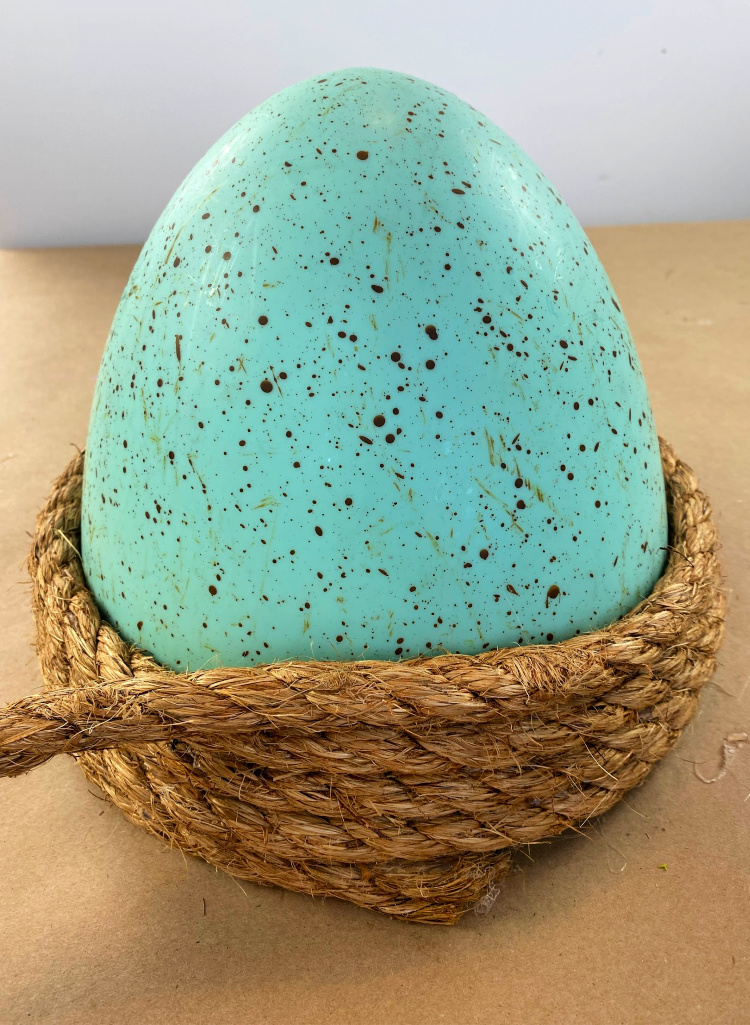
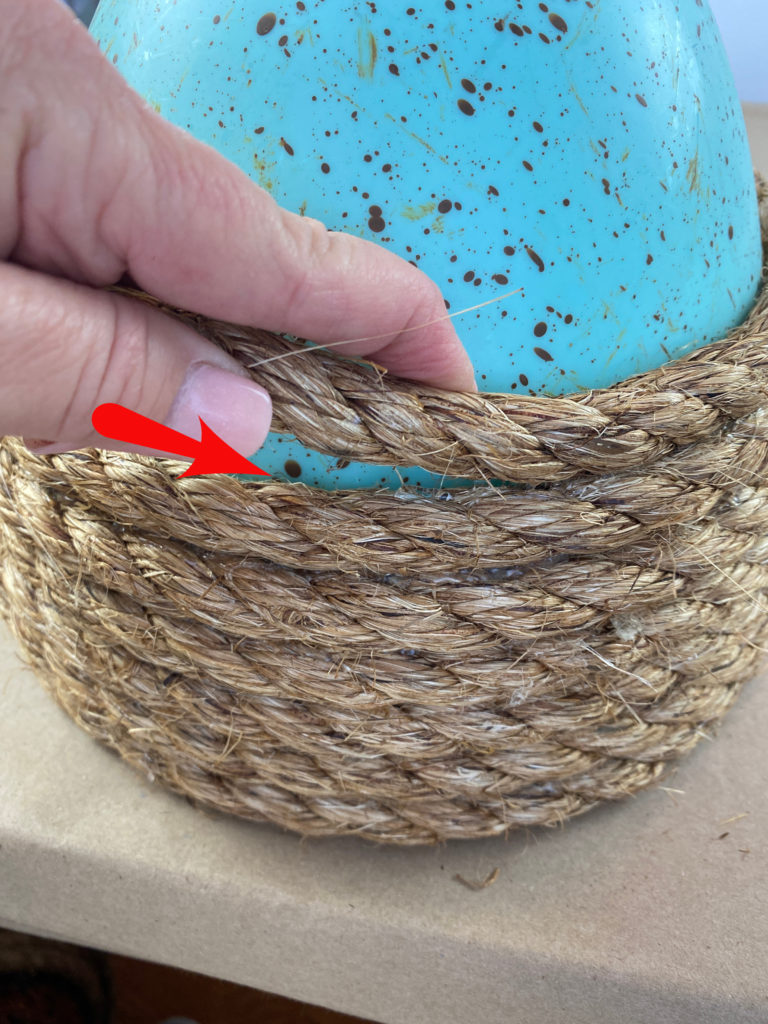
Continue to wrap the rope around the egg and continue gluing the rope. You will use the glue on the top of the rope and push the top layer of the rope down hard to secure the ropes tightly.You can see above where the glue is to go. Do NOT glue the rope to the egg, you are just gluing the rope to itself.
Step 3:
Continue wrapping and gluing the rope as you work your way up and around the egg shape. Be careful not to burn your fingers on the hot glue. You can always use silicone finger protectors to prevent burns. You will want to hold the rope together until the glue has cooled and the pieces of rope are secured to one another.
Step 4: Finishing off the skep
You will complete your skep by gluing the rope into a circle at the top. Cut the rope with a pair of wire cutters.
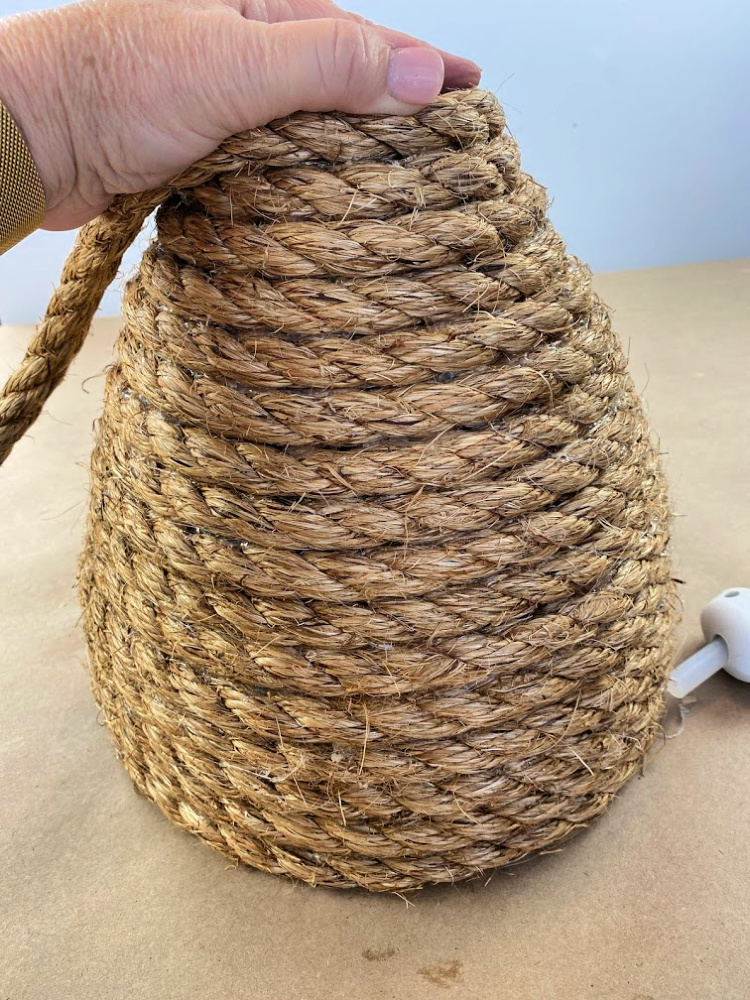
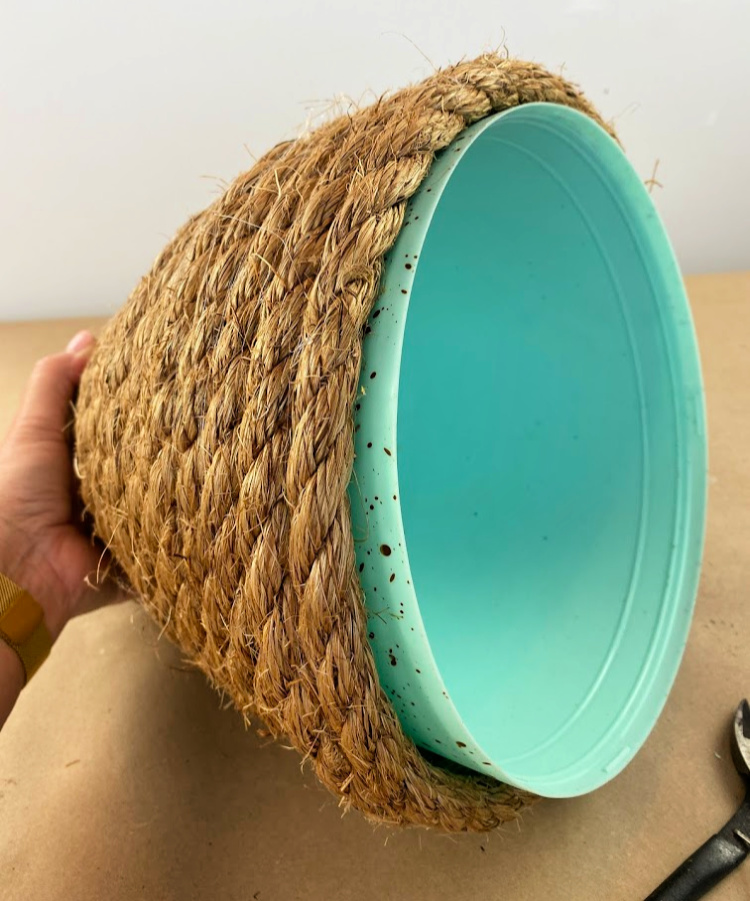
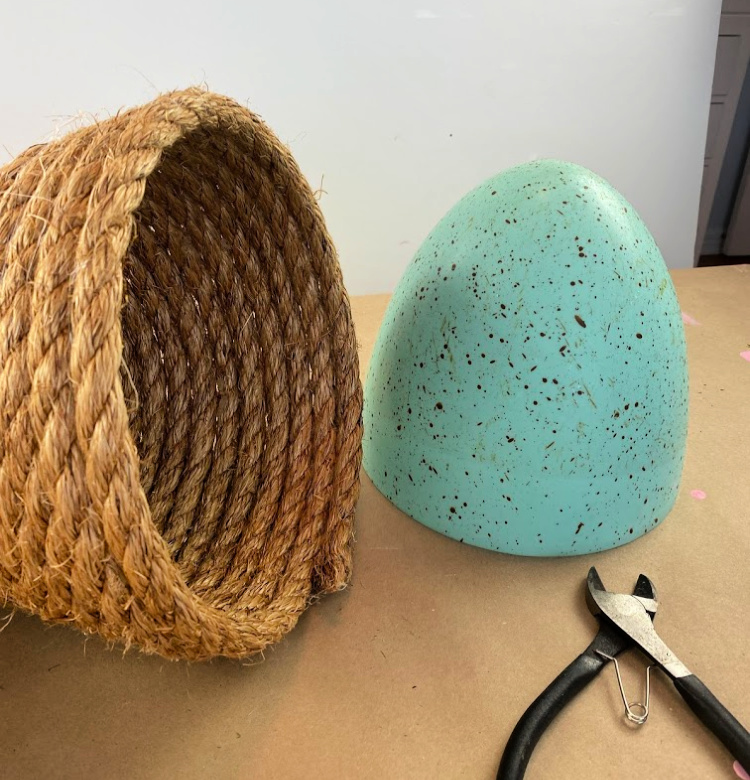
Step 5: Remove the egg from the skep
Slide the egg out of the rope skep. If you have been careful not to glue the rope to the egg form, the skep will slide right off. Your skep should be firm and sit up on its own.
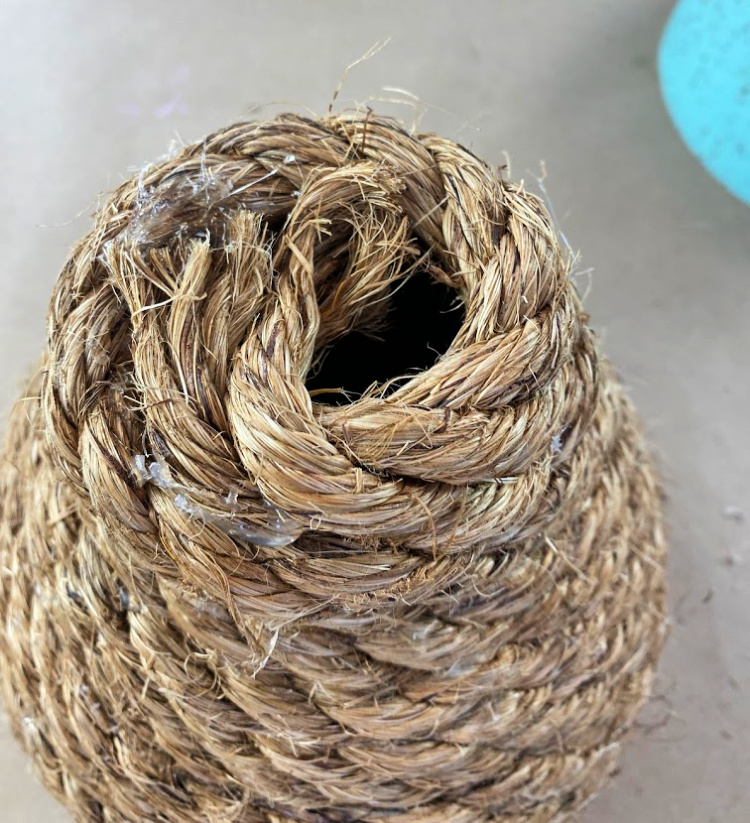
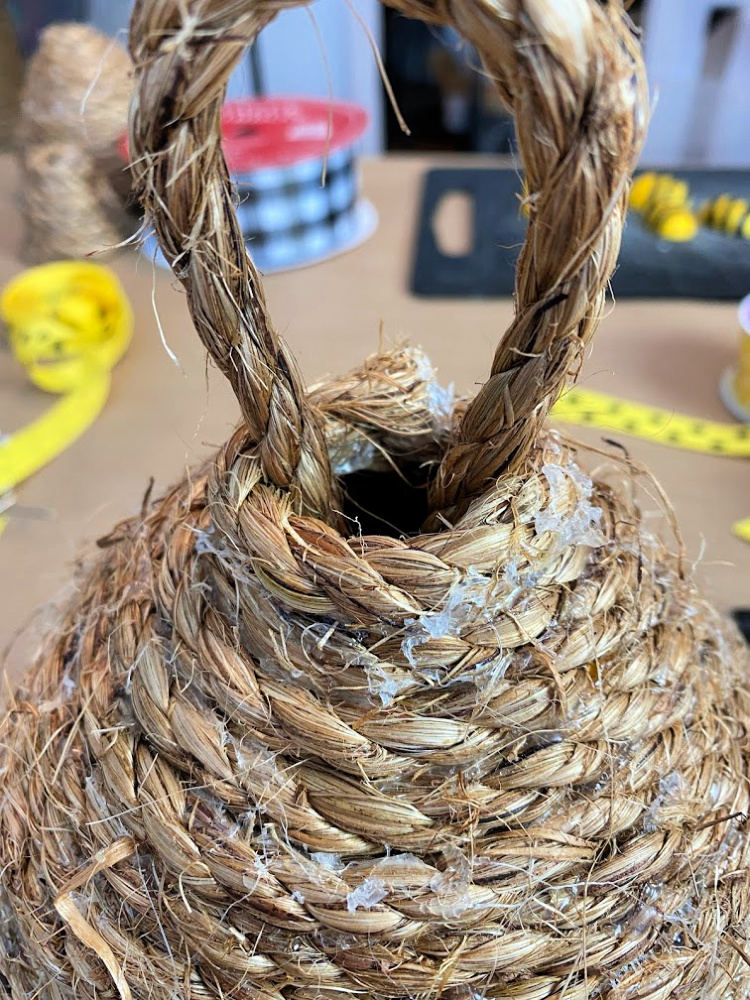
Step 6: Finishing off the top of your skep
The top of your skep will look something like this. I like to add a nice loop of rope to the top of my bee skeps. With a loop, the skep can be hung to be displayed if you like. The loop also allows for the ribbons to be attached to the top of the skep.
Take a pair of wood skewers, cross them, and secure them in the top of your bee skep as shown below. You may use a little bit of hot glue to make sure the skewers do not wiggle loose.
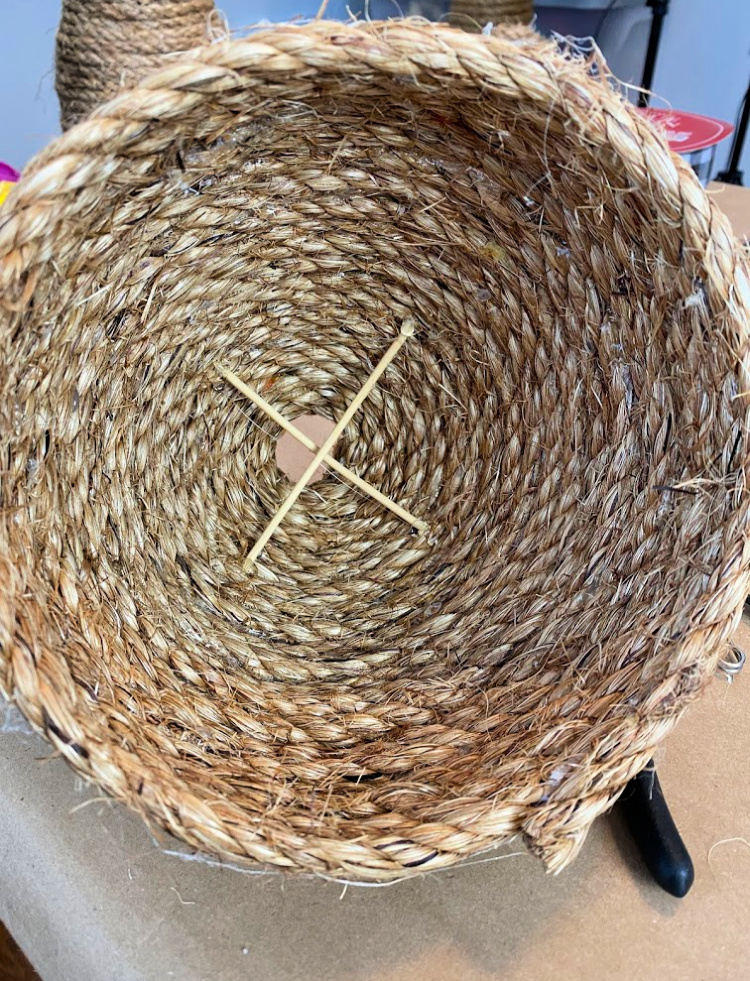
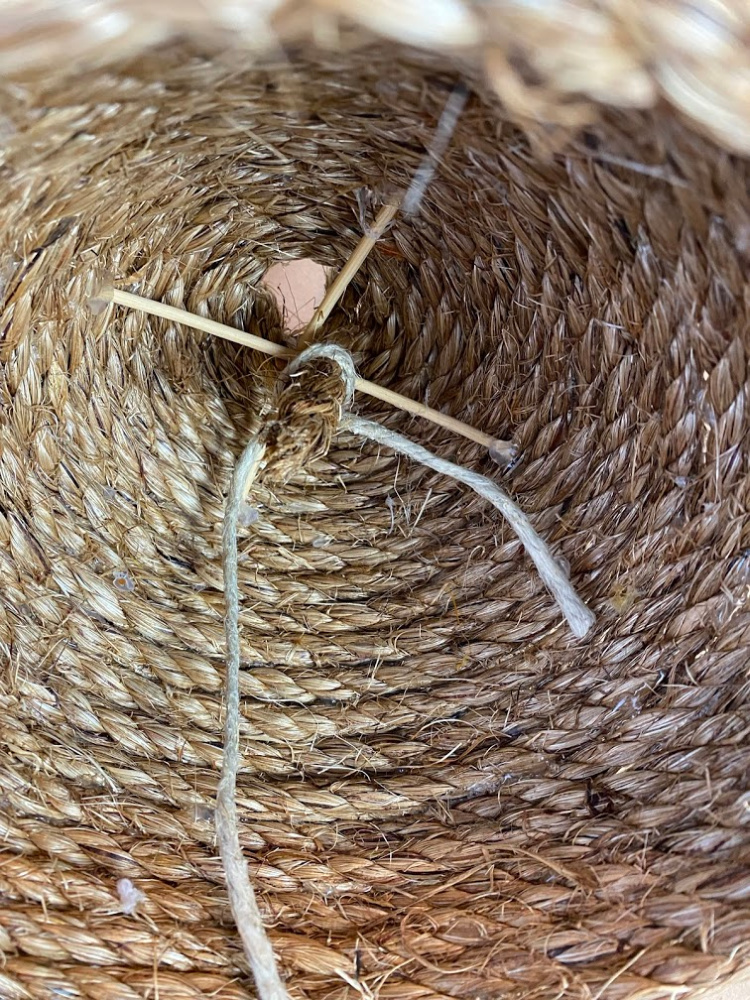
Make a loop out of your rope, wrap it down around the crossed skewers and tie the two ends of the rope to secure the loop. I used a smaller piece of twine to tie the loose ends of rope beneath the X of the dowels. Now there is a loop to suspend the skep. I will get rid of all of that extra hot glue by using a hot hair dryer after I am all done!
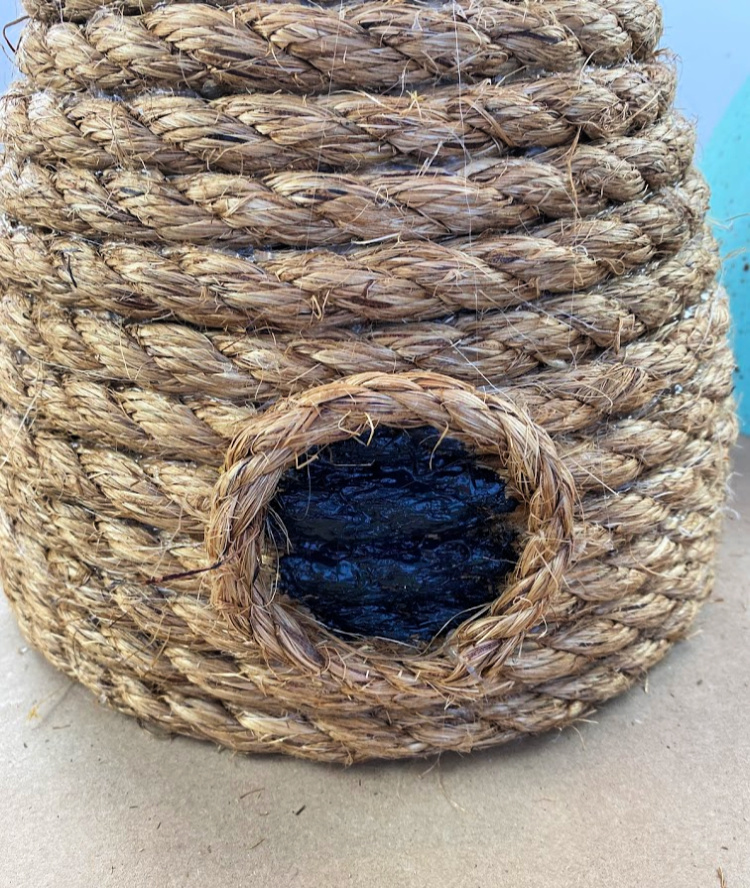
Step 7: Adding a door for your bees
Get out your black paint and shake it well.

Paint a circle onto the skep where you want the “door” to your honey bee skep to be.
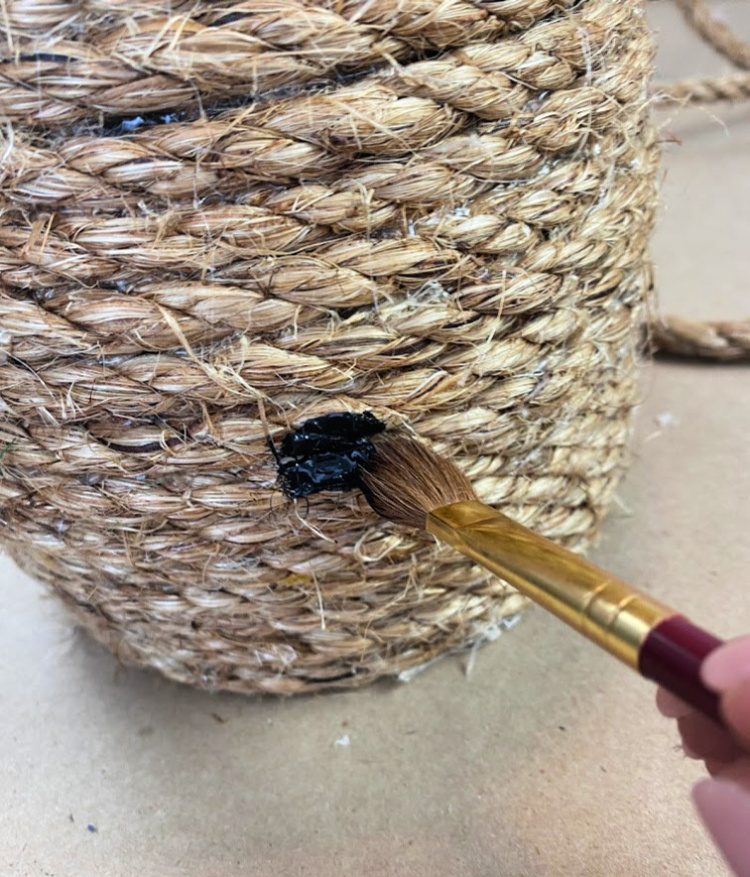
Cut a piece of rope.

Glue the piece of rope into a circle.
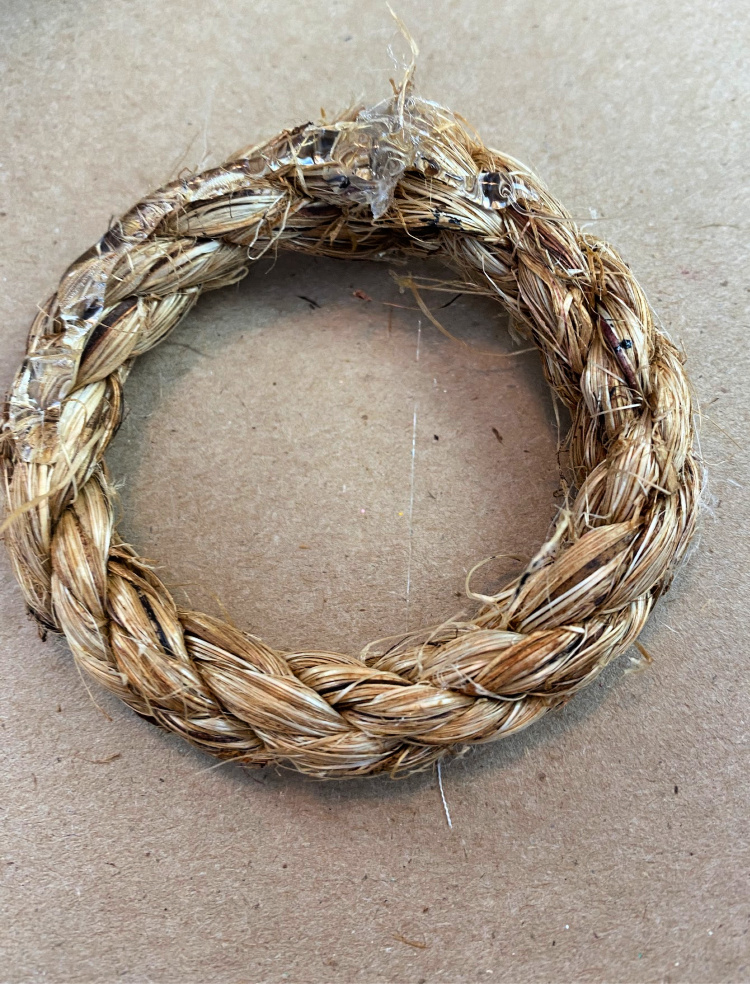
Glue the circle of rope to the skep over the black circle.
Step 8: Personalize your bee skep
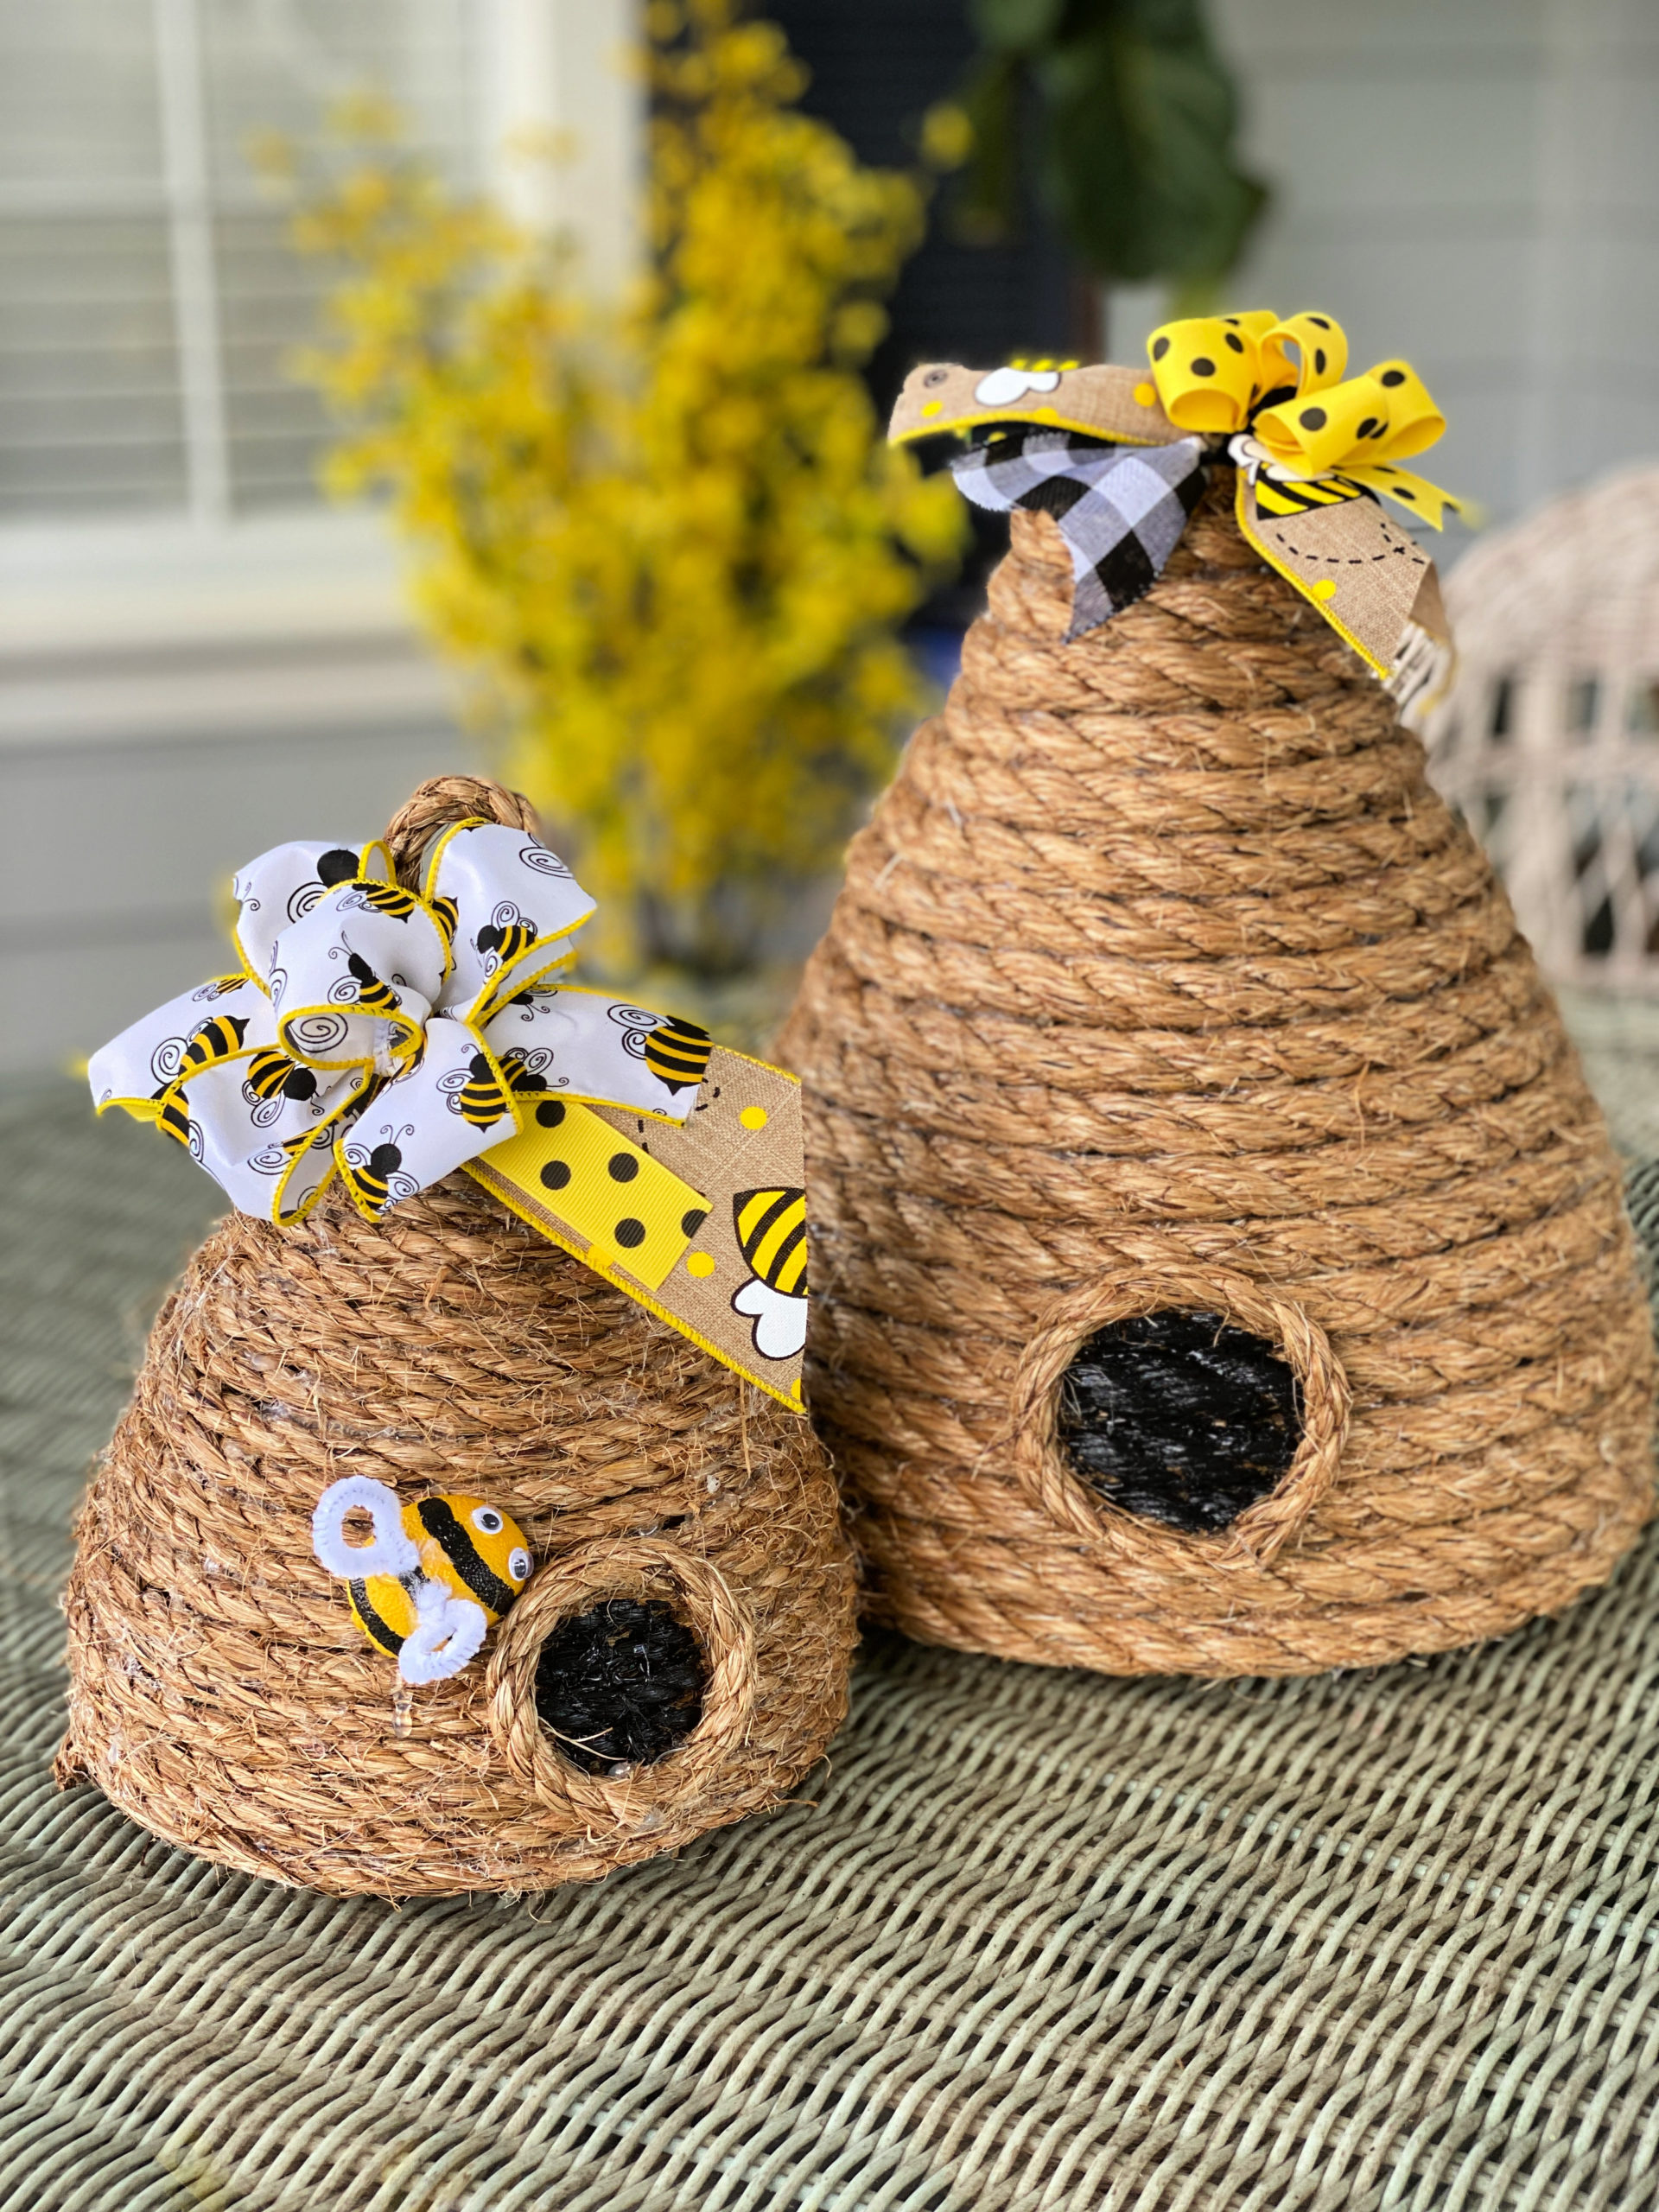
Now is your chance to get creative! Add a bow or some fun bee ribbon, perhaps some adorable little felt bees! I love the little bee lights, myself! These will add adorable bee decor to your home or garden!
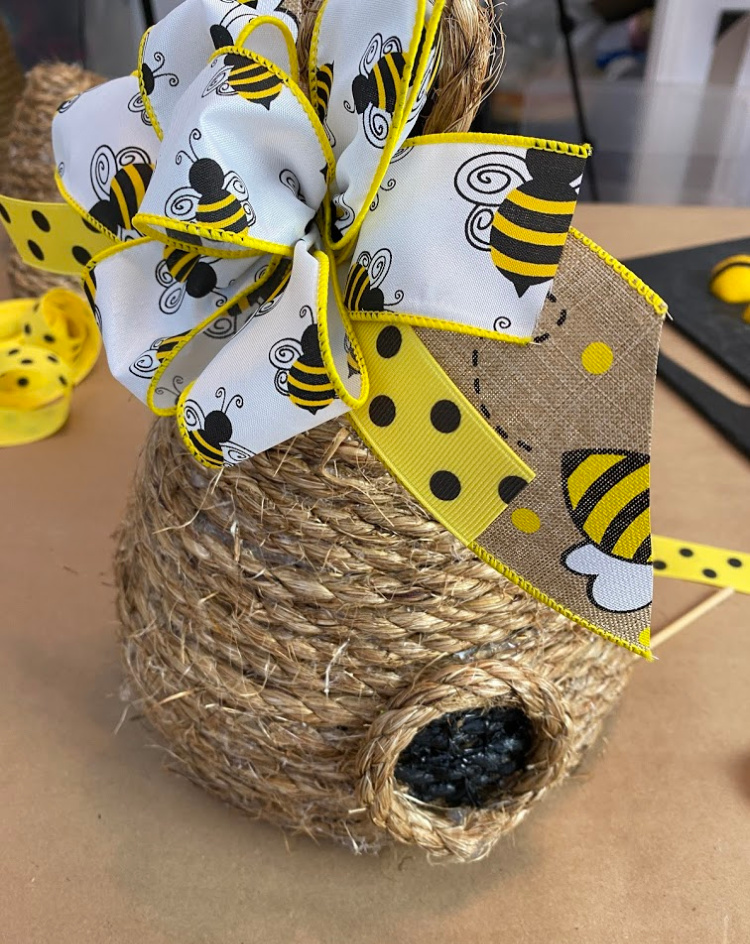
These skeps are perfect summer decor!
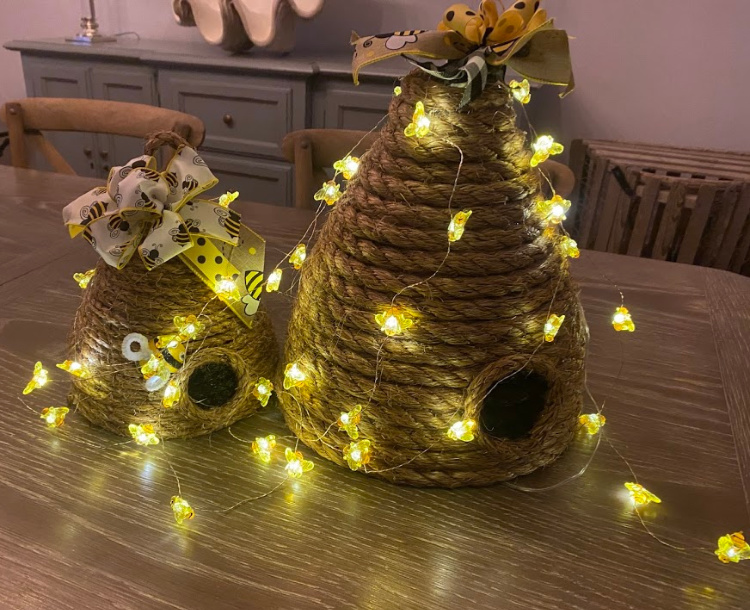
I found these fun bee lights that come with a remote control, so I can hide the battery pack inside my skep and turn them on without having to move it. Check out the mini bee skep! They make fun little favors at a bee-themed luncheon!
PIN THIS!
Check out more of my crafts at Celebrate & Decorate Crafts.

My skeps are ready to display…for now on my front porch. Where would you display your skeps?
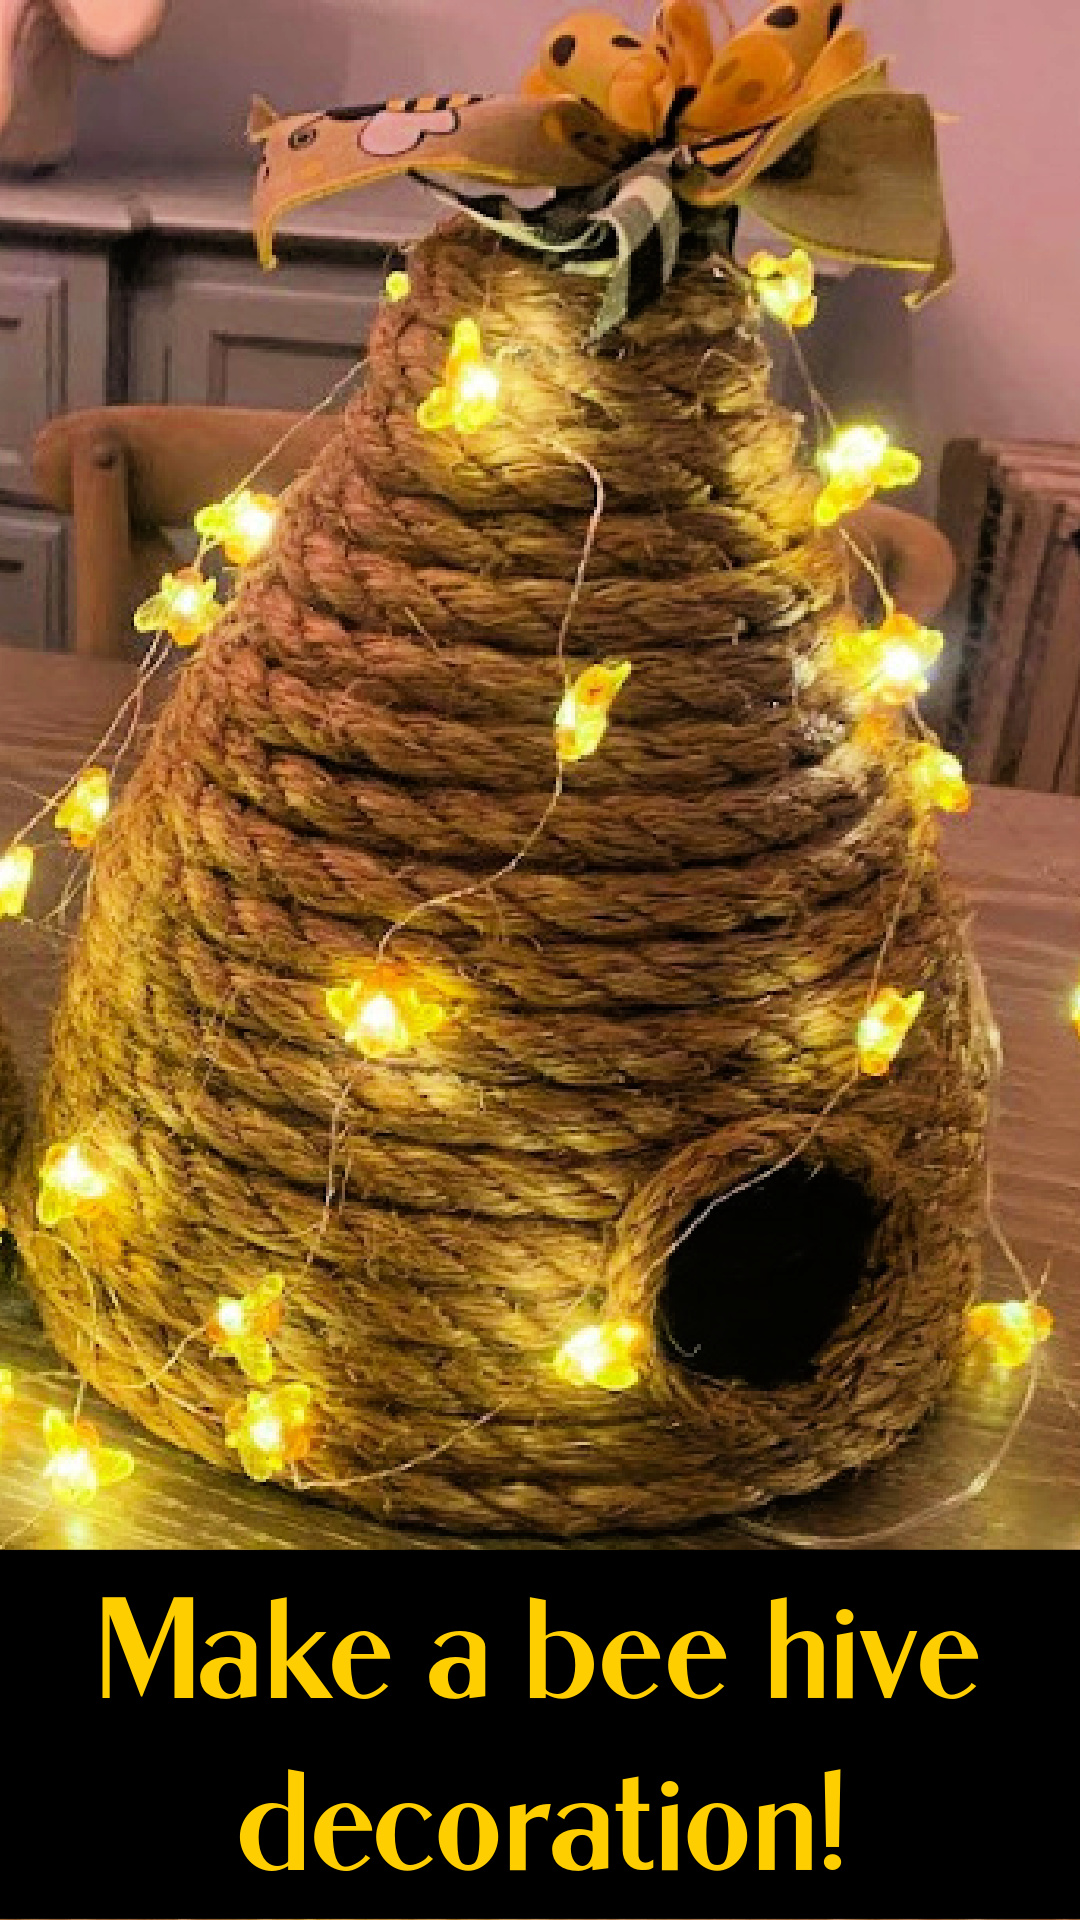
Don’t these little bee lights make this just the cutest thing ever!!??
Make these bee hives for garden decorations, table centerpieces for a baby shower or spring luncheon! Can you think of more ideas where you might want to display your hives?
If you would like to read more about bee skeps, you can find more at Honey Bee Suite.
Very sweet. I love how you recycled the rope from your Christmas tree decorations too. Keep the projects coming. 🙂
Thanks Karen, I am stretching my brain to come up with new ideas for every day!
Omg, you are so creative ! I love everything you make. Do you have any ideas for wedding crafts, mother of the brides house decorations for wedding pictures? Thanks
Thank you so much! I would certainly make a pretty wreath in the wedding colors or maybe all white for your front door. Maybe add tulle to it to make it more bridal. Next week I will be sharing a picture of the faux wisteria I have done around my front door for spring. It would be a lovely look for wedding pictures, make sure you tune in next week to see it!
Chloe,
I have seen these made before and yours is the best!
I didn’t see the egg coming but it makes so much sense. It gives the perfect form.
Love the bee lights too! Pinning my friend
Cindy
Thank you so much Cindy!!
Thank you for your tutorial on the bee skeps. You make things look so easy that I had to try them. I used a small glass dome to make six for individual ones for place settings and used a circle of blackboard sticker behind the circle of jute for the door instead of paint, that way I can write names in chalk for name place card idea. Thanks for all your wonderful ideas.
I love the idea of putting them at each place setting! That is brilliant to use them for place cards!
Adorable, Chloe! Great idea using the egg. It’s the perfect shape! Love the accessories, too! You can also cover the egg in plastic wrap to help with not gluing the rope to the egg.
Thanks Gail! I thought I would have trouble with it getting stuck on the egg, but it didn’t really!
This is adorable!! I love the bee lights, too. Thank you for sharing how you inserted the hanger. How creative!
Thanks so much Michelle!
Chloe, it probably will come as no surprise that I love all things bee, bee-cause of my name! My first Favorite Things Party had a bee theme and I made all kind of decorations — including much smaller skeps for wreaths, etc. Yours are fabulous! Great idea using the large eggs too. And, those lights — bee still my heart!
That is the cutest craft! I watched your video and the bees are adorable!
Happy day friend!
karianne
I think these are the prettiest bee skeps I have ever seen! And such a smart tutorial for creating them! Pinned, and I’m featuring you at Tuesday Turn About this week!
Thank you so much Julie. I am not only in love with my sweet skeps, I seem to just want to keep making more! I will soon be without any more rope, so on to something new!
What size jute did you use
Hi Cindy! I used two different sizes on my two different skeps. I have not been able to go out, so I used rope from an old Christmas project, so I don’t know what size I used. I am sorry I don’t have that information.
This is a super clever idea. I have to try it out.
Have a safe and healthy spring,
Kippi
Thank you so much Kippi! I am in love with these skeps! I think I will keep making them until I run out of rope!
This is just beyond cute. I was fooled by the black paint, it does look like a door for the bees to enter. So adorable and fun. Pinned
Oh, yes, it is a little surprise, isn’t it? Thanks so much for pinning!
The themed ribbon really took it over the top and yes I buy things at the end of the season also. Trouble is, sometimes I don’t remember where I stashed them, LOL!!
Thanks so much Sandra…I have the same problem. I am trying to use this time at home to sort through and clean out!
These look fabulous. I love your little bee lights. Thanks for so many pictures and instructions. It looks so easy to do!
Thank you Christine! It is so easy!
Such a creative idea Thank you for joining us over at our new link party Charming Homes & Gardens♀️
Thank you!
Chloe, I’m still drooling over these!! You are so creative and inspiring! Thanks for sharing at Charming Homes and Gardens!!
I am so in love with these, too!
I made this skep and loving it. I used a plastic planter. Very happy with the results. Thank you
Where did u get your bee lights.love the bee hive❤️
Hi Jean! I got those on Amazon. Here is the link:https://amzn.to/3eLNi5N
That is just adorable! Pinned.
Thank you so much Joanne! Thank you for pinning!
How cute! The lights add the perfect touch! Thanks so much for linking up with me at A Themed Linkup 56 for Crafts and DIY. Pinned!
Thank you so much, it was so fun to find your party and join! Thanks fo pinning!
CONGRATS! Your post is FEATURED at A Themed Linkup 57 for All Things Printable from my previous linkup for Crafts and DIY!
Thank you so much! I am not a printable gal, but I will head over for a visit!!
I have been seeing these everywhere but didn’t know what they were called. Your project is wonderful and you made it so easy to do. And that ribbon is just darling. Thanks so much for sharing the idea. I have selected this project to be one of the features this week. #HomeMattersParty
So adorable! So smart to use a big Easter egg!
WOW! It is so cute! I like your idea.
I love your wonderful ideas! One question: do you not need to add a bottom or just leave it open?
Thank you! I just leave the bottom open. You can take a piece of cardboard and glue it to the bottom if you wanted a bottom on it.
Such a great idea, using Easter eggs! I need to make a mini skept and have been trying to figure out what to use for weeks! Thanks
Thanks so much Bonnie! I hope you can find one to use this time of the year! I thought about it and looked on Amazon, here is a 10 inch one if you can’t find one elsewhere! I would love for you to share a picture of your skep when you finish it! Have fun!
Luckily, I had the mini eggs in my Easter stash. It was the perfect size. Unfortunately, I do not know how to add a pic of it, altho, did reply with a pic on your Pinterest.
What a lovely tutorial! I adore the idea of making a decorative bee skep for my garden. The step-by-step instructions were clear and easy to follow. Can’t wait to try this out and add a touch of whimsy to my outdoor space! Thank you for sharing your creativity!
I absolutely loved this post! The step-by-step instructions made it so easy to follow. I can’t wait to create my own bee skep and display it in my garden. Thanks for sharing such a charming project! 🐝🌼
I absolutely love this idea! The step-by-step instructions are so clear and easy to follow. I can’t wait to try making my own bee skep to add a charming touch to my garden. Thank you for sharing such a creative project! 🐝✨
This is such a charming project! I love the idea of adding a decorative bee skep to my garden. Your step-by-step instructions are clear and easy to follow. Can’t wait to give it a try and add a touch of whimsy to my outdoor space! Thank you for sharing!