Make an Easter Egg Topiary
EASTER EGG TOPIARY

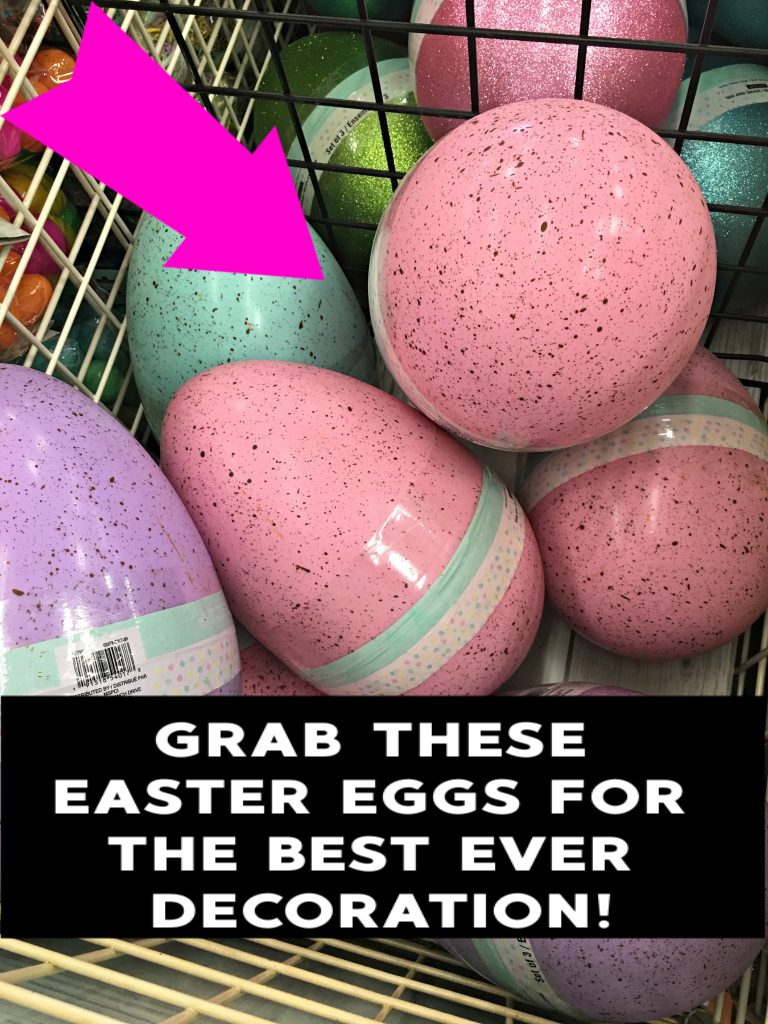
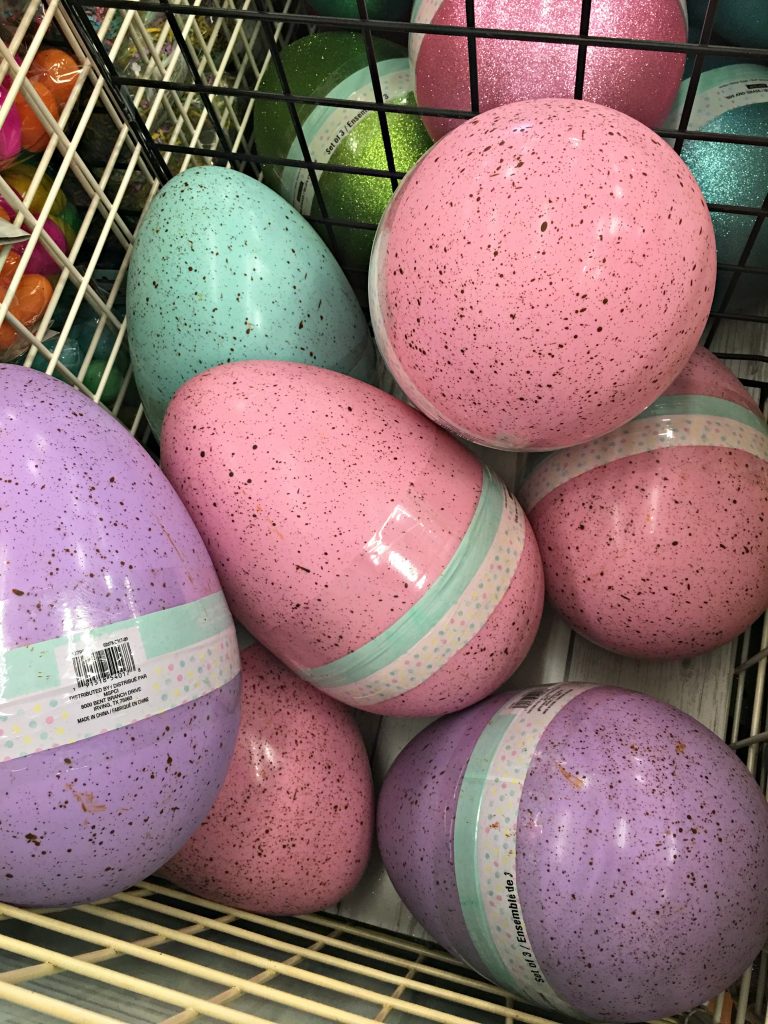 I spotted these giant Easter eggs in a bin at Michael’s. I didn’t know at first what I was going to use them for, but I knew I would come up with something. The bin was looking a little empty and I didn’t want to come back later and find they were all gone! While I was at Michael’s I picked up a 36″ long 5/8″ dowel and a block of styrofoam.
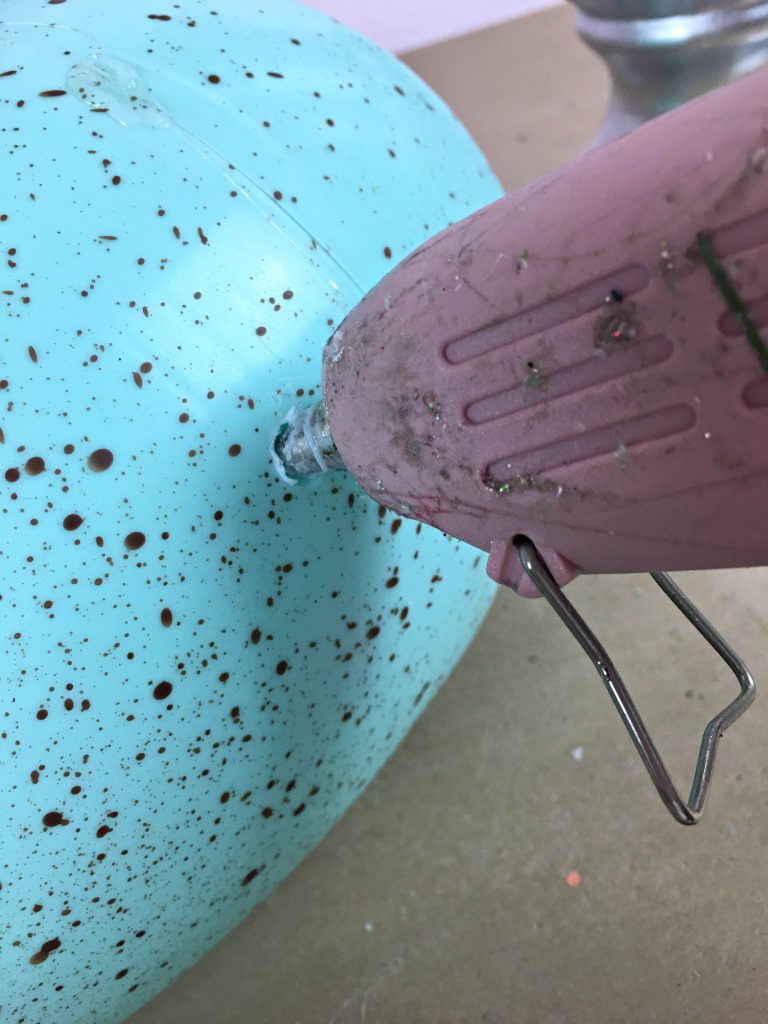 I tried a drill which didn’t work too well, so I turned back to my Christmas topiary trick by melting with my old glue gun. If you do this, make sure you are outdoors or in a well-ventilated area as it may cause noxious fumes. I simply hold my old empty glue gun against the eggs and melt a hold big enough for a 5/8″ dowel to fit through.
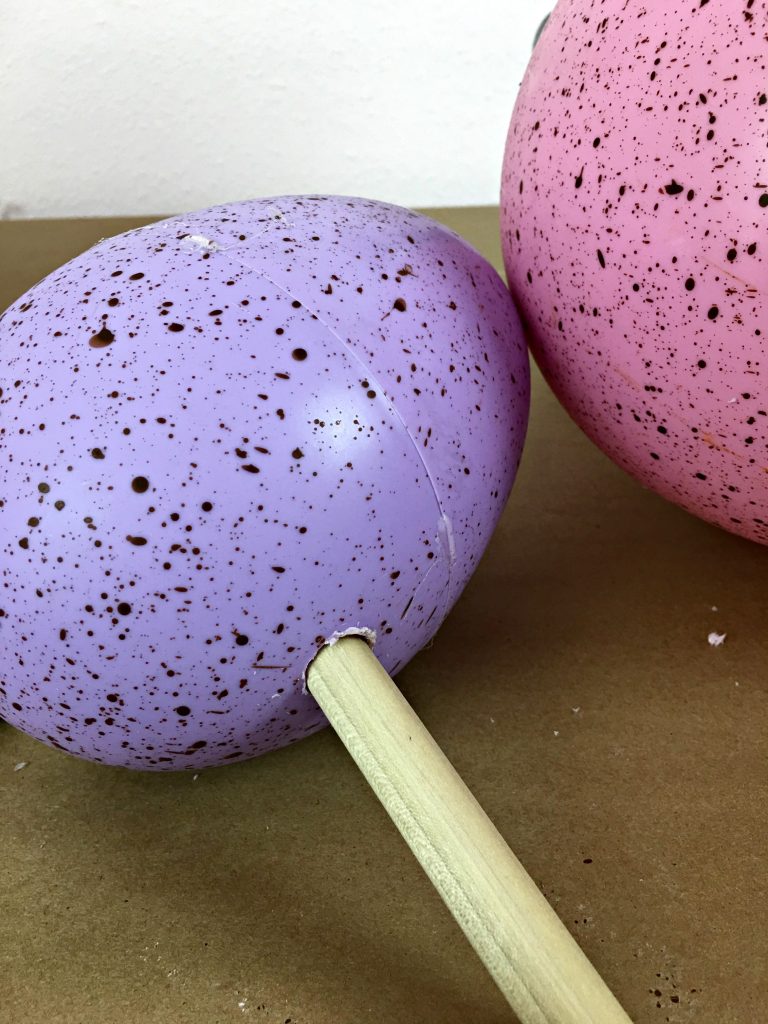 These eggs come in a nested set of three, each a different pastel color. I made the holes across the eggs in an angle, I knew I didn’t want my eggs to be stacked straight on one another.
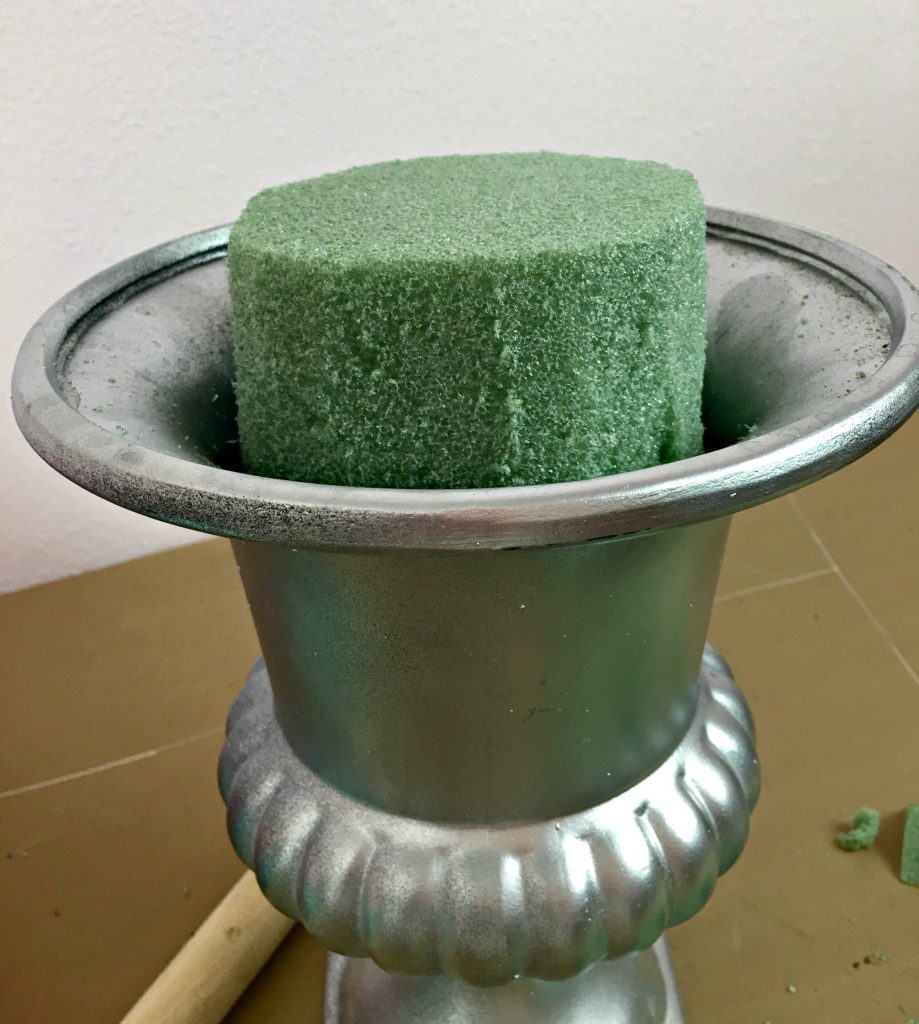 I had this container at home, I took the block of styrofoam, trimmed it and wedged it very firmly into my urn.
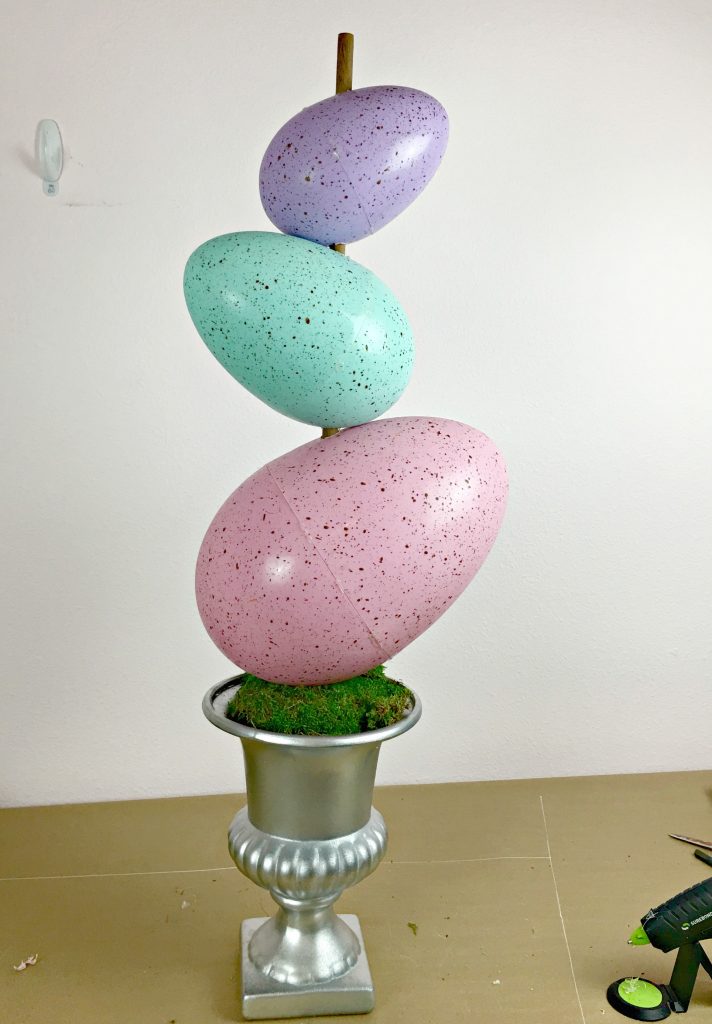 When all of the holes are done and the eggs are threaded on the dowel, you simply stick the dowel down into the styrofoam. I covered my styrofoam with moss. You could not melt a hole in the top of the smallest egg and just finish it off with the egg at the top, cutting the dowel to fit, but I found my egg was more secure with the dowel going all the way through.
 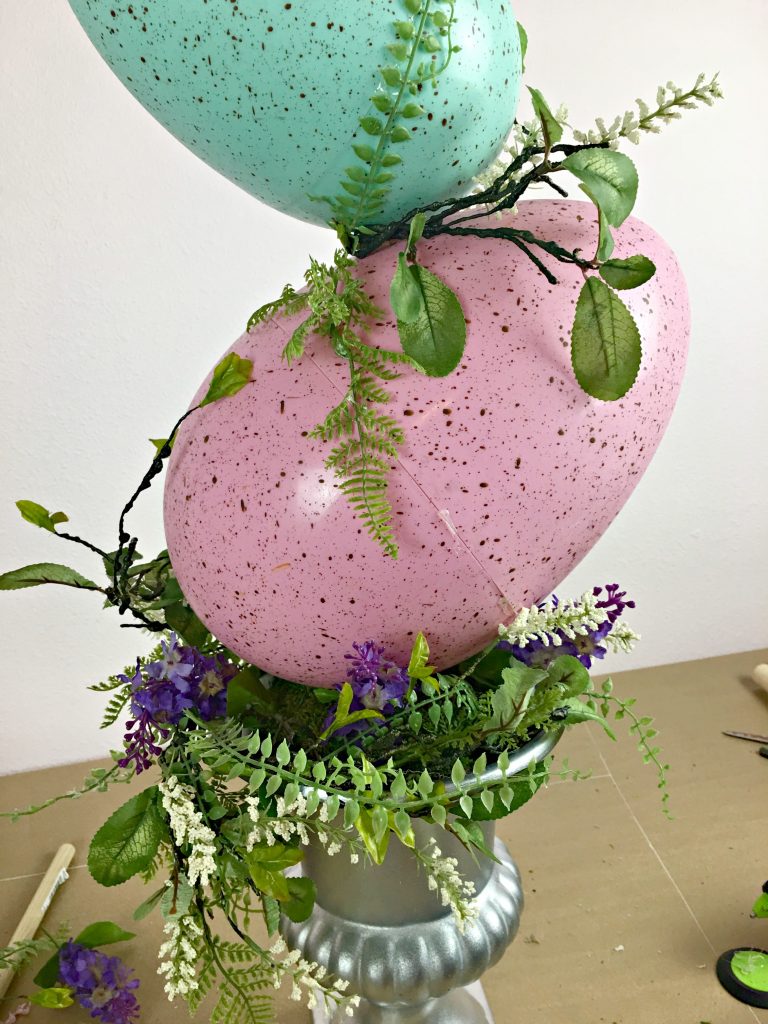 Fill the pot around the bottom egg with artificial flowers and greenery to make a little “nest” for your eggs. You can even add a little bunny peeking out if you would like.
 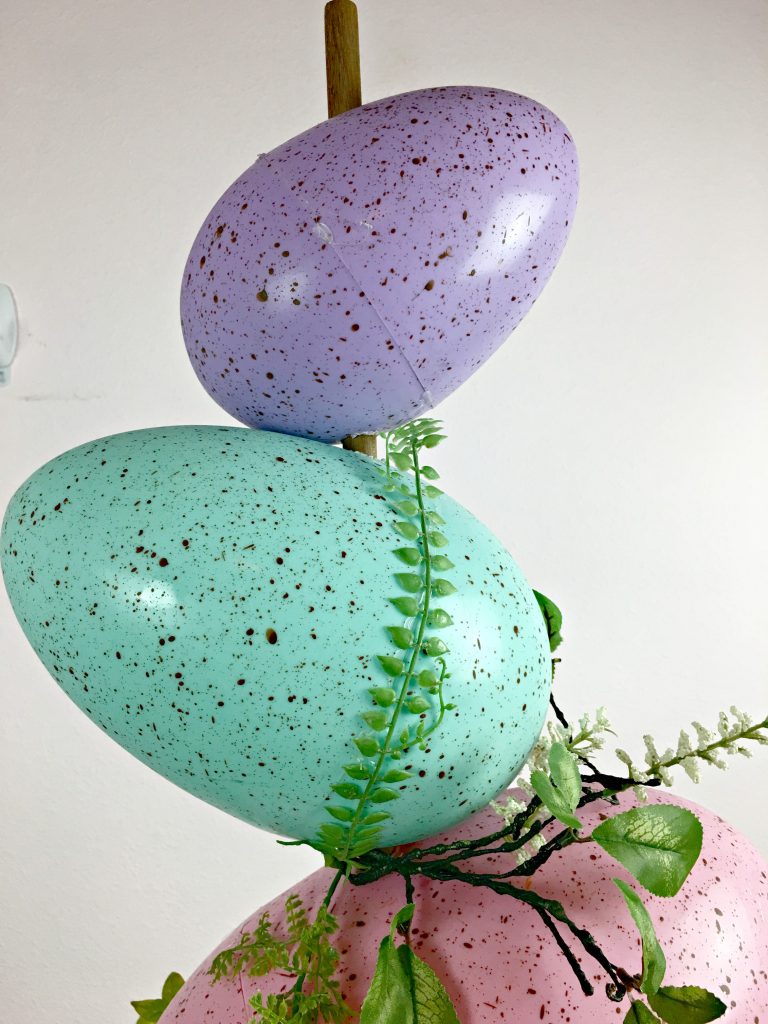 Once the mechanics are done, it is time to have some fun and decorate the topiary. I used a variety of silk flowers and foliage, using hot glue to attach them to my eggs. Above you can see how I used a fern to hide the seam in my middle egg.
 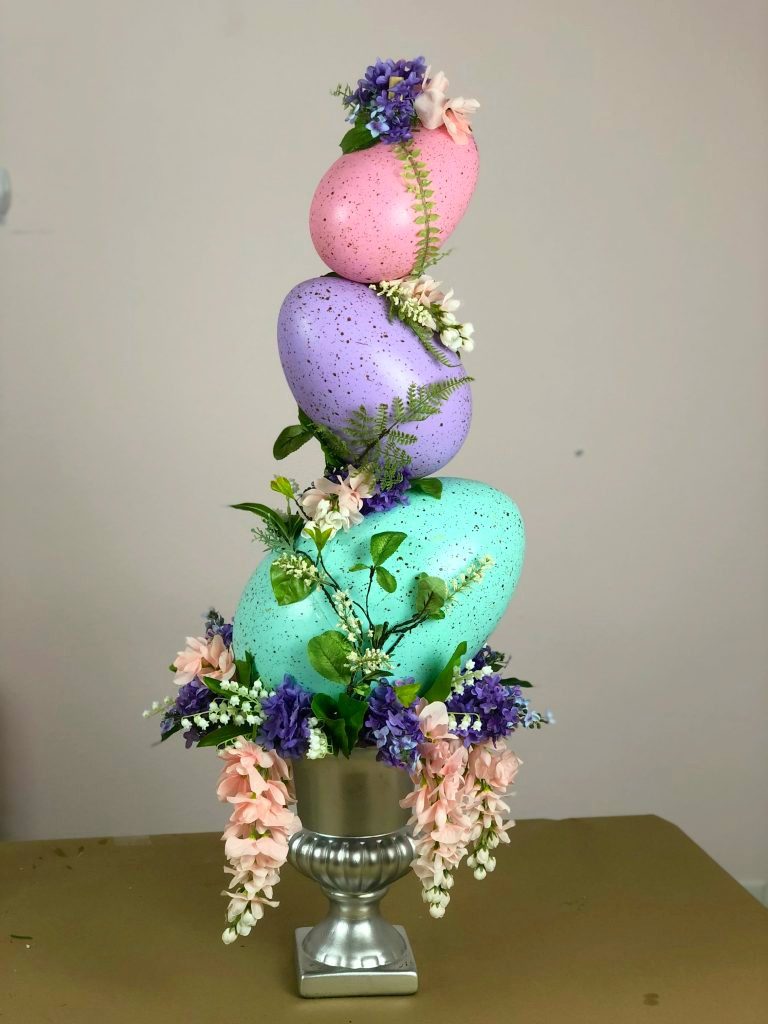 My favorite of the flowers that I added were the pretty pink silk wisteria, also from Michael’s. Those along with lilacs and lily of the valley were nestled around my bottom egg and glued between the eggs of my Easter egg topiary, hiding the mechanics of the dowel. The same treatment was made for the dowel on the top of the top egg.
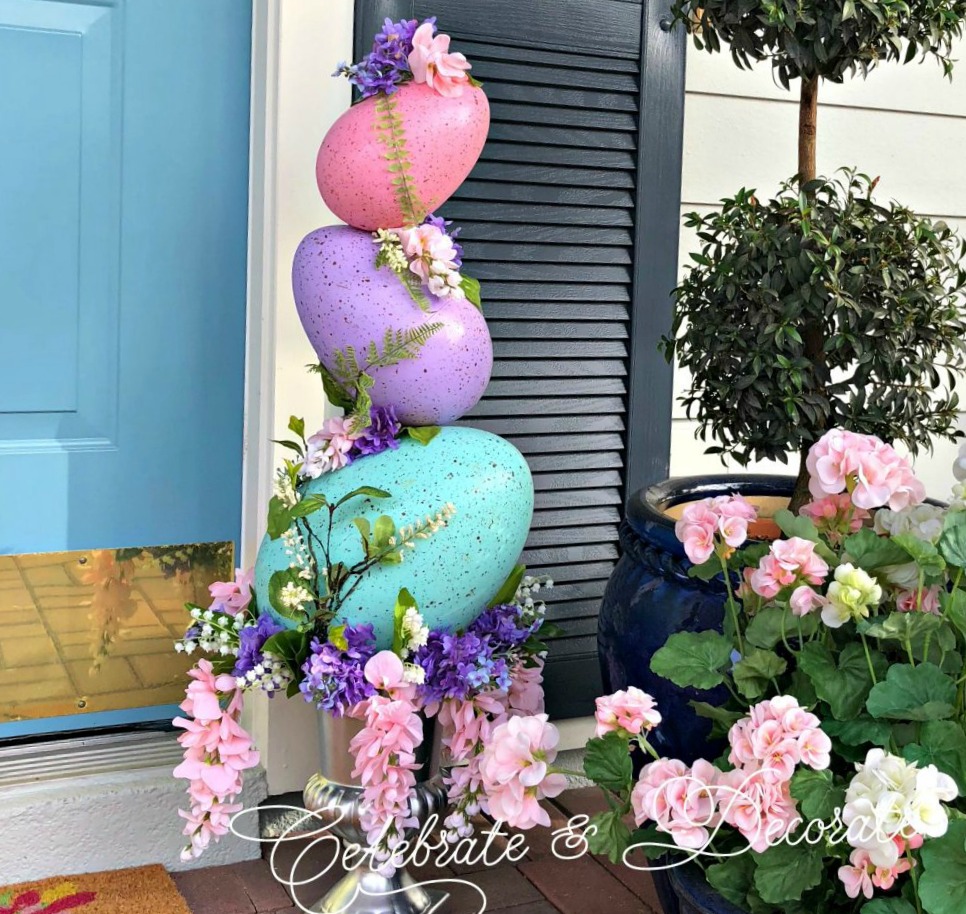
  I couldn’t be happier with how my Easter egg topiary turned out. This is the perfect addition to my front porch to celebrate springtime and Easter! Let me know if you make one of these! I would love to see yours! You can share your photos over on Facebook in Chloe’s Crafters!
 If you want to watch a video tutorial, see it here: youtube
Lovely
Thank you so much Jeanne and thank you for stopping by Celebrate and Decorate!
I love this Easter egg topiary. If I can find the eggs I have to try one when I get home from vacation. Beautiful work as usual!
Thank you so much Leah! Enjoy your vacation!!
What a lovely idea, Chloe! You are so creative. Have a wonderful weekend!
Thank you so much Pam, it is a bright spot on my front porch for ushering in Springtime!
OMG Chloe, I just love ’em! What a punch of wow at the front door! I may have to get myself to Michaels pronto! Anyone that comes to your front door will have a big smile on their face.
Beautiful as all of the different Items you make, this gave me an idea as what to make for a front porch decoration, Thank you Chloe.
Oh my, Verona, thank you so much for your kind complement. This is a perfect decoration for a front porch for springtime!
You are so freakin’ clever, Chloe, not only for the finished product, but in how you get there (using that glue gun to melt a hole)!. It looks fabulous!
Thank you Rita, I thought a drill would be better, but I think I need new drill bits! I used the same technique on oversized Christmas ornaments for my Christmas topiary!
I LOVE this Chloe, just adorable!!
Thank you Jenna, I was really happy with how it turned out!
What a cute idea! I saw those eggs the other day but didn’t have any vision for what to use them for. Great idea and not too hard to achieve!
Thank you so much Liz! When I find myself spending a ridiculous amount of time wandering around stores like Michael’s until an idea strikes me! You wouldn’t believe how many things I put in my cart, walk around with and then take back out! This is easy, I think anyone can do it!
I love the Easter egg topiary ! What a fun and whimsical idea. Your lily of the valley has inspired me today to pick up some today ( faux of course because the snow is finally melting) . I was looking for some new ideas today and was going to spring decorate this weekend. Thank you for the inspiration
Thank you Mary Anne! I spotted those big eggs and wanted to do something fun with them but I didn’t want it to be kitschy, more classy. I think the lily of the valley and the wisteria were the perfect complement! Have fun shopping and creating! Thanks for stopping by Celebrate and Decorate!
Great idea..been using my large eggs in a terra cotta basket in yard so I will be trying this idea , in case I can’t find this eggs.. thanks for sharing..
Thank you Marlene, I was very happy with how it turned out!
I love evrything you make, this easter eggs idea is so beautiful, hope I can try it ,thank you so much for sharing all your beautiful ideas…..
Thank you so much Mattie! I try to keep sharing my crafts!
Creative, talent, fantastic, and gorgeous. Thank you for sharing. Your topiary is beautiful on your porch.
Congratulations! Your post was my feature pick at #WWBlogHop this week. Visit me at https://www.marilynstreats.com on Tuesday evening to see your feature! All hosts choose their own features from the comments left on their blog so be sure to stop by and see your feaure. I invite you to leave more links to be shared and commented upon. Please be sure to leave your link number or post title so we can be sure to visit!
Thank you so much Marilyn, I am so honored!
Just lovely, Chloe! You did such a lovely job on this Easter egg topiary! Thanks for sharing at Homestyle Gathering!
I can not find the eggs anywher
You will be able to find them about 6 weeks before Easter at Michael’s.
How do you determine where the top hole in your egg will go when you are getting them to sit “off center”? I love this idea!!!
Thank you for sharing!
Pam, I just sort of angle the dowel and tap it on the inside and determine from that where the hole goes!